Homemade Granola Bars

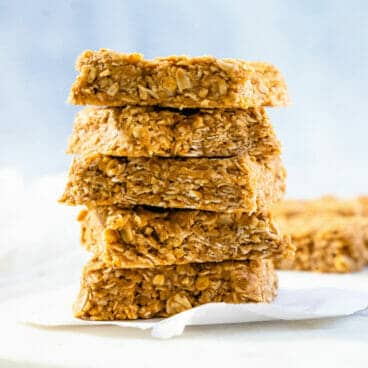
This chewy homemade granola bars recipe is so much tastier than store-bought! It’s one of our top healthy snacks to make at home.

Granola Bars

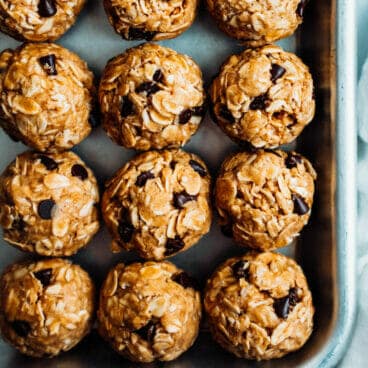
Here’s a DIY healthy snack recipe that’s 100% worth making at home, if you’re got the time: Homemade Granola Bars! Packaged bars are ultra convenient: we buy them for on-the-go snacks. But the flavor of a homemade bar is infinitely more delicious! The secret here? Lightly toasting the oats brings out a delightfully nutty undertone. Mix them with honey, peanut butter and cinnamon for a pure, wholesome flavor: and add any mix-ins you’d like. Mini-chocolate chips are our favorite: they add a hint of sweetness to what still qualifies as a healthy bar (we think).

Ingredients in this chewy granola bars recipe

This granola bars recipe results in a chewy bar: it’s a no bake recipe that’s the opposite of the crunchy, baked variety. But there’s one spot where you’ll fire up the oven: for toasting the oats. Otherwise, it’s a dump and stir method! Here’s what you’ll need for this healthy granola bars recipe:

  • Creamy peanut butter (or sunflower butter for nut free)
  • Honey (or agave syrup for vegan)
  • Old Fashioned rolled oats
  • Cinnamon
  • Salt
  • Mix ins: nuts, dried fruit, seeds, or mini chocolate chips
Granola bars recipe

The flavor key: toasting the oats

This recipe is for no bake granola bars: with the exception of a quick 10-minute stint in the oven for the oats! Don’t even think about omitting this step. Here’s why:

  • Toasting the oats adds major nutty, irresistible flavor. You might be tempted to skip this part, but it’s absolutely worth it! The flavor it adds is incredible.
  • You’ll need just 10 minutes at 350 degrees. It’s quick and simple, and easiest in the oven because it lets you place all the oats in a single layer in a pan. (Technically you can toast oats on the stovetop, which we do in our Toasted Oatmeal recipe.)

Important note on granola bars mix-ins

Mix-ins are where you can get creative in these granola bars! A wide variety of nuts, seeds and dried fruit will work. But here’s an important thing to remember:

  • Finely chop the mix-ins so the bars hold together. Huge nuts and seeds cause the texture of the granola bars to become more fragile, making them break more easily.
  • Use mini chocolate chips, not standard size. Same idea as above: the standard size may cause texture issues. Mini chocolate chips are just the right size for incorporating in a granola bar. Just ½ cup gives great bursts of chocolate flavor. You can chop standard sized chocolate chips if it’s all you have.
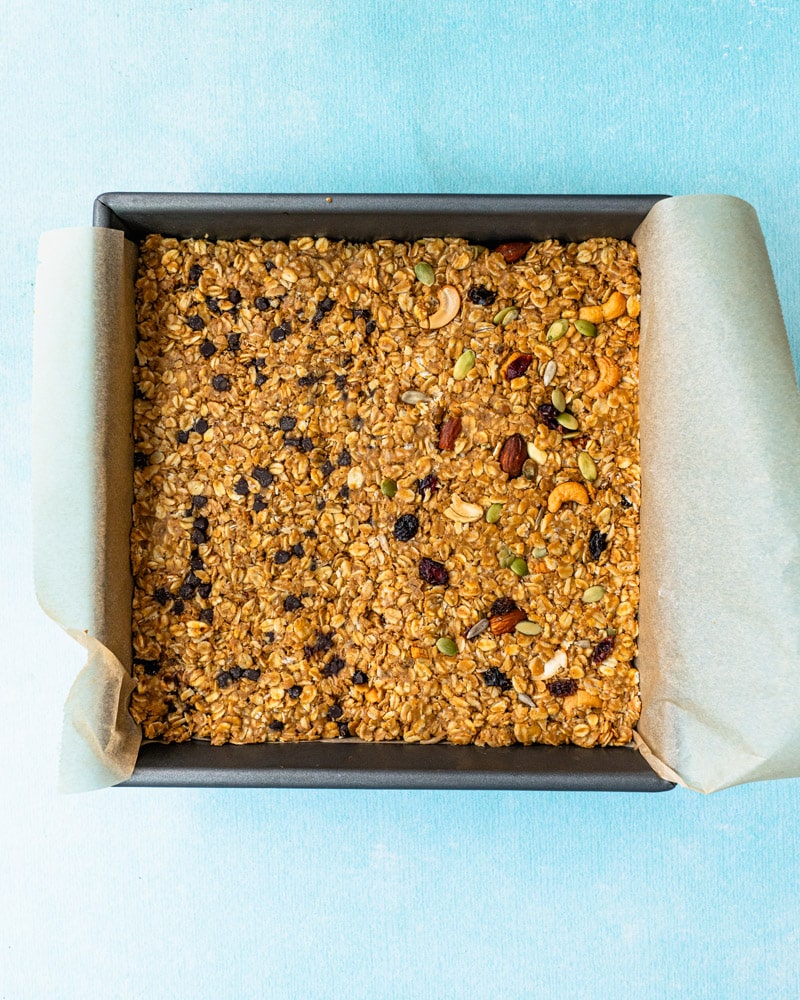
Homemade granola bars

Cutting granola bars

After you press your granola bars into a pan and freeze for 10 minutes, they’re ready to cut! You can cut them into different shapes, depending on what you’re looking for. The traditional granola bar rectangle is what you see here, but you can also do squares and get more servings out of it.

  • Cut 14 bar sized shapes: measure each to 4 ½ by 1 ¼ inches
  • Cut 20 rectangles: measure them to be 4 x 5 inches

Store refrigerated (chill a few hours before serving)

This chewy granola bars recipe is best after refrigerating for a few hours, which helps the texture to firm up. Technically you can eat them right away, but we prefer them chilled so they become more solid.

You can store homemade granola bars for up to 3 weeks in a sealed container. If you’d like, you can also individually wrap them in wax paper or parchment paper and secure them with tape.
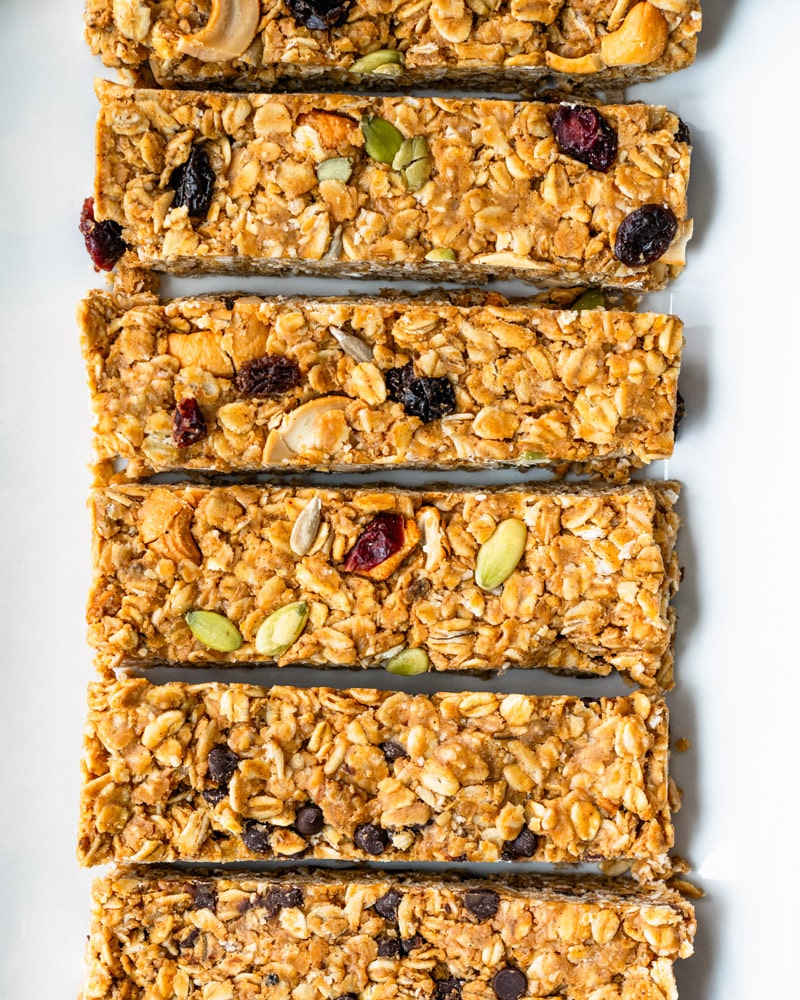
Healthy granola bars

Granola bar flavor combinations

Our favorite flavor for this recipe? Chewy chocolate chip granola bars, of course! But there are so many more fun flavor combinations. Here are some ideas to get your wheels turning:

  • Peanut butter and jelly: add dried cherries or freeze dried strawberries
  • Dried cranberry and white chocolate chips
  • Pepita and cashew
  • Blueberry muffin: add dried blueberries and chopped almonds
  • Pecan pie: Add chopped pecans and ½ teaspoon allspice
  • Coconut mango: Add shredded coconut and chopped dried mango

What are you planning to add to your granola bars? Let us know in the comments below!

More healthy energy bars

There are so many ways to make a healthy energy bar recipe at home! Here are a few more to try starring peanut butter and oats:

This healthy granola bars recipe is…

Vegetarian, dairy-free and gluten-free. For vegan and plant-based, use agave syrup.

Print
Granola Bars

Granola Bars Recipe


  • Author: Sonja Overhiser
  • Prep Time: 20 minutes
  • Cook Time: 10 minutes
  • Total Time: 30 minutes
  • Yield: 14 to 20
  • Diet: Vegetarian

Description

This chewy homemade granola bars recipe is so much tastier than store-bought! It’s one of our top healthy snacks to make at home.


Ingredients

  • 1 cup creamy peanut butter (no sugar added; substitute sunflower butter for nut free)
  • ½ cup honey (or ½ cup agave syrup for vegan)
  • 3 ½ cups Old Fashioned rolled oats
  • ½ teaspoon kosher salt
  • ½ teaspoon cinnamon
  • Up to 1 cup finely chopped nuts, dried fruit and seeds, or ½ cup mini chocolate chips

Instructions

  1. Toast the oats: Preheat the oven to 350 degrees Fahrenheit. Place the oats in a single layer on a baking sheet and toast them for 10 minutes until lightly golden. (This step adds incredible toasty flavor to the oats: don’t skip it!)
  2. Mix the ingredients: Transfer the oats to a large bowl and mix in the peanut butter, honey, oats, salt and cinnamon in a bowl. Stir in mix-ins.
  3. Form into bars: Add a sheet of parchment paper to a 9″ x 9″ pan, letting the edges drape over the sides. Place the mixture into the pan and press it into an even layer. Add a few more mix-ins to the top of the bars, if you’d like. Use a small glass to roll over the top to make them as smooth at possible.
  4. Freeze and cut the bars: Freeze the bars for 10 minutes. Then remove the pan from the freezer and use the parchment to lift the bars out of the pan. Use a sharp knife to cut them into 20 rectangles (that are 4 x 5 inches) or 14 bar sized shapes (that are 4 ½ by 1 ¼ inches). Store in the refrigerator for up to 3 weeks. The texture is most solid after you refrigerate for a few hours, so if you have time do that before tasting the first bar. If you’d like, you can individually wrap the bars with parchment paper or wax paper and secure the wrapper with tape.
  • Category: Snack
  • Method: No Bake
  • Cuisine: Snack

Keywords: Granola bars, Granola bar recipe, Homemade granola bars, Chewy granola bars

A Couple Cooks - Recipes worth repeating.


from A Couple Cooks https://ift.tt/3AIuwEz

Classic Ratatouille

This traditional ratatouille recipe is made the classic French way! Sop up these stewed late summer veggies with bread or serve as a side.

Ratatouille Recipe

Sure, you’ve heard of the Ratatouille movie: but do you know what ratatouille actually is? Not surprisingly, this humble dish that’s not anything like it’s glamorized movie version: thinly sliced vegetables served in a swirled stack. This classic French dish of stewed late summer vegetables is anything but fancy, but it’s a darn good way to use seasonal produce! Serve it as a side dish with fish or chicken, or as a main dish with white beans and crusty bread.

What is ratatouille?

Ratatouille is a classic dish from Southern France of stewed vegetables. There’s no formalized recipe or method, but it typically includes eggplant, tomato, zucchini, onion, and bell pepper. It’s a humble stew and surprise: not anything like the ratatouille you see in the Pixar movie.

  • Where did the Disney ratatouille recipe come from? In the 1970’s French chefs started making a version of the dish with thin sliced vegetables. French chef Thomas Keller riffed on this concept in his 1999 cookbook, calling the recipe Confit byaldi. Confit byaldi adds a tomato and pepper sauce on the bottom (piperade), then garnishes the thin-sliced vegetables with balsamic vinaigrette.
  • Chef Thomas Keller actually served as food consultant for the movie Ratatouille! He suggested this way to serve the humble dish to a food critic, which is how it made its way into the movie. It does seem like a pretty genius spin for a mouse to think up, so we’re glad to know it was actually a great real-life chef. (Source)
Ratatouille Recipe

Making a traditional ratatouille recipe: some tips

A traditional ratatouille recipe is a humble vegetable stew, filled with end of summer vegetables. Is it worth making? Absolutely! It’s a comforting dish that makes your kitchen smell like heaven as the garlic sizzles. The way it enhances the flavors is out of this world! Here are a few things to note about this ratatouille recipe:

  • Saute the veggies in two batches. The amount of vegetables is too large for the pot, so to get a good caramelization on them you’ll sauté in two batches. While some modern spins roast their ratatouille veggies, we wanted to go as classic as possible.
  • Then add garlic, tomatoes, and veggies and cook 30 minutes. At this point it’s totally hands off, so you can prepare the rest of the meal.
  • Serve with pistou if desired. Even better, serve it with classic French pistou over the top! Keep reading.

Serve with pistou to take it over the top

Though this is a traditional ratatouille recipe, we couldn’t resist adding a little spin! (Sorry, Remy.) Add a little green sauce to make this one really shine! What’s pistou?

  • Pistou is a classic French Provençal sauce made of garlic, olive oil and fresh basil. It’s like Italian pesto but without pine nuts, which gives it a looser texture.
  • Use an immersion blender or a mortar and pestle to make this traditional sauce.
  • The fresh, garlicky flavor notes really add to this humble dish.
Pistou

How to serve ratatouille

Ratatouille is a late summer recipe that works as main dish or a side dish for roast chicken or fish. But keep in mind: it’s all vegetables with no major source of protein to keep you full. To serve it as a main dish, pair it with a protein like white beans, chickpeas or bread and cheese. Here are some ideas:

How would you serve it? Let us know in the comments below.

Ratatouille Recipe

More classic French recipes

Love classic French recipes? Here are a few more delicious ways to enjoy French food:

This ratatouille recipe is…

Vegetarian, vegan, plant-based, dairy-free and gluten-free.

Print
Ratatouille

Classic Ratatouille Recipe


Ingredients

  • 1 medium eggplant, 3/4” slices
  • 1 medium zucchini, cut into 1/2-inch thick bite-sized chunks
  • 1 green pepper, diced
  • 1 yellow onion, sliced
  • 4 garlic cloves, minced
  • 3 tablespoons olive oil, divided
  • 1 large tomato, roughly chopped
  • 28-ounce can crushed San Marzano tomatoes
  • 1 ½ teaspoons kosher salt, divided
  • ½ tablespoon lemon juice
  • ¼ cup roughly chopped basil
  • Pistou, for serving

Instructions

  1. Prep the vegetables (except tomatoes) and add to a large bowl. Add the 2 tablespoons olive oil and kosher salt and toss to combine.
  2. In a large frying pan or large cast iron skillet, heat 2 tablespoons olive oil over medium high heat. Add half of the vegetables and cook about 5 minutes, stirring occasionally until lightly browned (not fully cooked) and remove to a bowl.
  3. Reduce the heat to medium. Add another drizzle of olive oil and cook the second half of the veggies in the same manner for about 5 minutes, then remove them to the same bowl.
  4. Keep the heat on medium. Add the minced garlic to the hot pan. Cook about 10 seconds, stirring constantly. Then add the chopped tomatoes with their liquid and cook for 30 seconds. Add the crushed tomatoes and ½ teaspoon kosher salt. Then add the cooked vegetables and stir.
  5. Simmer about 30 minutes until tomatoes are reduced and veggies are all tender, stirring occasionally. When it’s done, stir in the lemon juice, and add more salt and pepper to taste. Top with pistou if desired.

A Couple Cooks - Recipes worth repeating.


from A Couple Cooks https://ift.tt/3lNqzds

Homemade Sourdough Pasta (Small Batch)

You’ve made your share of bread and biscuits, pancakes and crackers… but here’s a brand new way to use up that discard: sourdough pasta dough. In fact, it’s so good you might find yourself feeding your starter a little bit extra, just so you have enough left over for a batch.

Usually, the bulk of the flavor in any pasta dish comes from the sauce. But throw a little bit of your sourdough starter into your pasta dough, and what you’ll get is a uniquely flavorful homemade pasta with a hint of tang that will elevate any recipe.

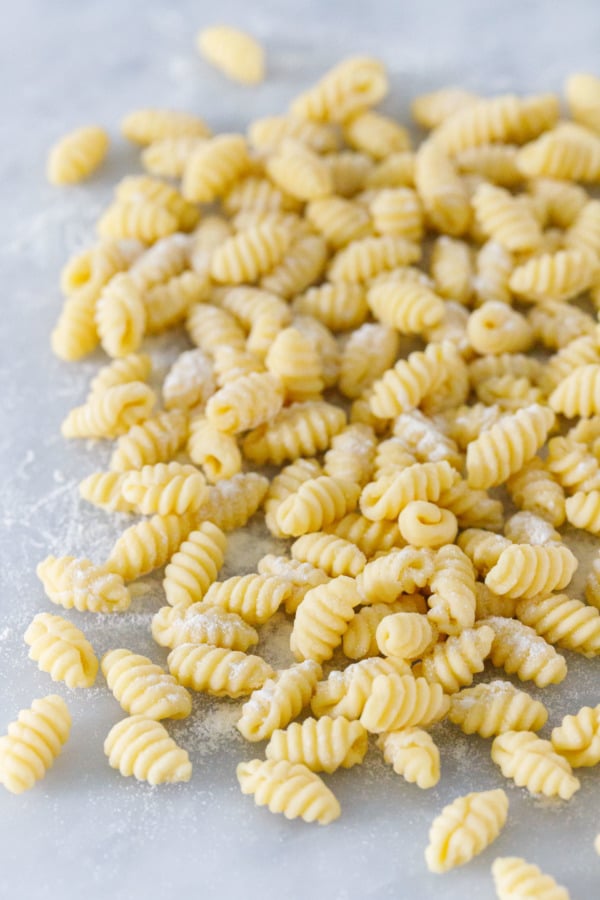
Closeup, pile of gnochetti sardi homemade sourdough pasta

Seeing as sourdough starter is simply flour and water, it makes sense that any recipe calling for both flour and water could make use of sourdough starter instead.

This holds true for this sourdough pasta dough recipe, which replaces about a third of the flour/water content with sourdough starter. Mixed with a bit of pasta flour and a single egg, the result is a delightfully chewy pasta with a bit of underlying tang that brings worlds of flavor to your favorite pasta sauce.

(more…)

from Love and Olive Oil https://ift.tt/3ivKTO9

Perfect Iced Latte

Here’s how to make an iced latte at home! This classic coffee drink is perfectly creamy, refreshing and espresso-forward.

Iced Latte

What’s more refreshing than an iced latte? It’s no wonder this espresso drink is massively popular. The combination of bitter coffee balanced by delicate sweetness and creamy, frothed milk is an absolute delight. There’s no need to run to your favorite coffee shop for this one: it’s easy to make homemade! To us, there’s nothing better on summer afternoons (or anytime, really).

What’s an iced latte?

An iced latte is a drink with espresso, milk and optional sweetener. The milk is often frothed to simulate the steamed milk in a standard latte. So what’s the difference vs iced coffee? Iced coffee uses brewed coffee and optional milk. Because an iced latte uses espresso, it has a stronger, darker flavor.

How to make an iced latte: basic steps

Here’s the outline of how to make an iced latte at home:

  • Step 1: Make a double shot of espresso.
  • Step 2: Froth ¼ cup whole milk by shaking it in a covered jar or whisking until frothy.
  • Step 3: Pour the espresso and 1 teaspoon maple syrup over ice. Add milk and serve.

Below are a few notes on the methods for how to make espresso and how to froth the milk.

How to make an iced latte

How to make the espresso

What makes an iced latte an iced latte? The espresso! Strong coffee will not do here. You’ll need the following items to make a double shot of espresso:

  • Espresso roast coffee: The roast is important to get the right dark, bitter flavor. Use a fine grind on the espresso beans.
  • Espresso machine, manual espresso maker, French press, or Aeropress: This espresso machine is fantastic: it’s pricey but it makes the best espresso. A manual espresso maker is much cheaper and portable, and makes great espresso. French press espresso also works well: it’s our top choice for decent espresso without a specific tool. Aeropress espresso works in a pinch: the flavor isn’t great, but it’s the cheapest option.

Milk to use for an iced latte

If you’re a latte fan, you’ll know: the best milk for a latte is whole milk. Why? Whole milk froths the best because it has the highest milk fat. With an iced latte, the exact texture of the milk is less important because it’s a cold drink. So you can get away with 2% if you’d like: it just tastes less rich!

The best milk for a vegan iced latte? Oat milk! Oat milk froths the best of any non-dairy milk. Since the cold version of a latte is less touchy than the hot one, you can substitute any other non-dairy milk if you choose: almond milk, cashew milk, soy milk, etc.

Frothing milk

Frothing the milk: a few options!

A good iced latte has lightly frothed milk, though some coffeehouses use straight milk. You can skip this step, but it adds a nice texture (and otherwise the drink strays into iced coffee territory). There are a few tools for the job that are easy to use:

  • Jar: You can simply place the milk in a jar and shake until it’s foamy!
  • Whisk. A whisk works too, and has a similar effect.
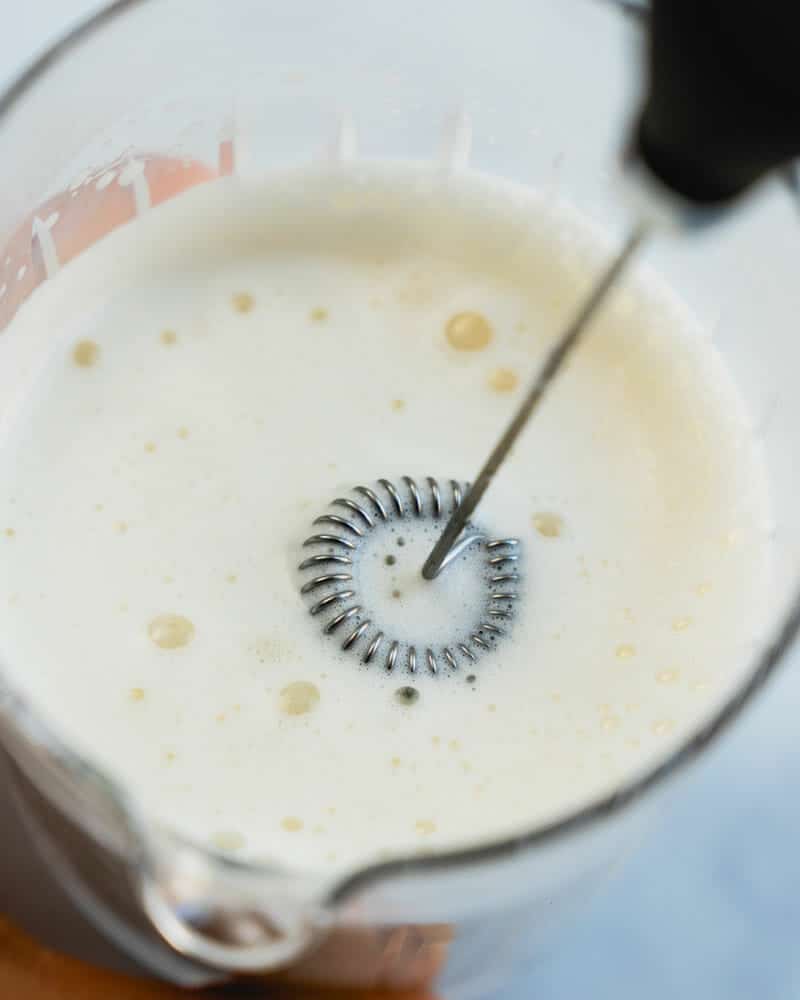
  • Handheld milk frother. If you already have a handheld milk frother for lattes, this is the best tool! It makes the thickest, creamiest frothed milk. See the recipe below for instructions.
  • French press. If you have a French press, it’s also great for making foam! It makes a nice frothy foam with bubbles a little larger than the frother.

For the last two methods, it’s easiest to use more milk than the recipe calls for because it froths better with a larger quantity. You can save it to make more iced lattes. And that’s it! Let us know if you make this iced latte in the comments below.

Iced latte

More latte recipes

Love a good latte? There are lots more to try: both espresso drinks and tea lattes! Here are some favorite recipes:

Print
Iced Latte

Perfect Iced Latte


  • Author: Sonja Overhiser
  • Prep Time: 10 minutes
  • Cook Time: 0 minutes
  • Total Time: 10 minutes
  • Yield: 1 drink
  • Diet: Vegetarian

Description

Here’s how to make an iced latte at home! This classic coffee drink is perfectly creamy, refreshing and espresso-forward.


Ingredients

  • 2 shots espresso
  • 1 teaspoon maple syrup (or simple syrup)
  • ¼ cup whole milk (or oat milk for vegan)
  • Ice (try clear ice!)

Instructions

  1. Make the espresso: Make the espresso using an espresso machine, manual espresso maker, French press, or Aeropress.
  2. Froth the milk: Use one of the following methods:
    1. Jar method: Place the milk in a covered jar and shake until foamy.
    2. Whisk method: Add the milk to a bowl and use a whisk to vigorously whisk it until foamy bubbles form.
    3. Milk frother: Use a handheld milk frother, which makes the frothiest milk. Place the milk in a tall container. Hold the container at an angle and turn on the frother. Move the frother up and down until foamy bubbles form, about 20 seconds or so. It’s easiest to use at least ½ cup milk (use the remainder for another iced latte).
    4. French press: Add the milk to a French press and pump using quick, short plunges until foamy bubbles form, about 30 seconds. It’s easiest to use ½ cup to 1 cup milk (use the remainder for more iced lattes).
  3. Add the espresso to ice-filled glass. Stir in the maple syrup and top with the frothed milk. Enjoy immediately.
  • Category: Drink
  • Method: Espresso
  • Cuisine: Latte

Keywords: Iced latte

A Couple Cooks - Recipes worth repeating.


from A Couple Cooks https://ift.tt/3xsCAqC

Raspberry Red Pepper Jelly

Sweet and spicy and fruity: that’s what this jelly is made of! With just the right amount of spice, balanced with sweetness and fruitiness ...