Instant Pot Hummus

This Instant Pot hummus is super creamy and easy to make from scratch using a pressure cooker! You’ll be hooked on the flavor.

Instant pot hummus

Here’s a fun trick you can whip up with your pressure cooker: Instant Pot hummus! Sure, it’s easy to buy store-bought hummus. But for the very best creamy chickpea puree: homemade hummus is where it’s at! It’s a great trick using your Instant Pot, and perfect if you whip up a big batch of chickpeas. This recipe comes straight to you from our friend Sarah Copeland’s new cookbook, Instant Family Meals: an incredible collection of beautiful recipes and genius tips for your pressure cooker. Let’s get started!

Why make Instant Pot hummus?

Hummus has grown from a niche food (when we were kids!) to a household staple today. Really, I don’t know what our household would do without it! We do buy our hummus often, but when we can, we like to make it at home. Which is why we love this hummus recipe from Sarah’s book! Why make Instant Pot hummus?

  • It’s got the best flavor. Many purchased hummus brands can be overly intense and garlicky, or too bland. Homemade hummus has just the right integrity in flavor.
  • It’s cheaper! Some hummus brands can be quite expensive: homemade hummus in an Instant Pot is cheaper than buying lots of hummus tubs.
  • It’s a great use for a batch of chickpeas. If you cook up a big batch of chickpeas in your Instant Pot, what better way to use them? Use half for hummus and half for eating.
Instant pot hummus

About the book: Instant Family Meals

This recipe is from the book Instant Family Meals by our dear friend Sarah Copeland, and it truly is a masterpiece! This collection of recipes is beautifully fresh, modern and sophisticated: just like Sarah’s recipes always are. (Her other cookbooks Feast and Every Day is Saturday are both big hits in our house!)

You’ll find recipes like Sweet Potato Tacos, Eggplant Parmesan, Cacio e Pepe Risotto, and Double Chocolate Cheesecake. Yes, please! There are wholesome healthy recipes for people of every diet, including lots for vegetable-forward eaters like ourselves. Congratulations to Sarah on this new masterpiece!

Instant Family Meals

A few tips for the chickpeas

Here we’ve provided a few methods for cooking the chickpeas in this Instant Pot hummus. You can cook lots of chickpeas, or just enough for this hummus. You can also soak the chickpeas to decrease the cook time and make for more tender chickpeas.

  • Cook just enough for the hummus. In the instructions below we’ve provided instructions to cook just enough chickpeas for the hummus recipe. This is great if you’re not sure whether you’ll use the rest of the chickpeas.
  • Make 1 pound chickpeas. You can cook up to 1 pound of chickpeas at one time! If you do this, you can eat the remaining chickpeas or freeze them for up to 3 months. Go to Instant Pot Chickpeas.
  • Soak if you have time. If you have time to soak the chickpeas over night, even better! Soak 1 pound chickpeas with 8 cups water for 10 to 12 hours. Then you can reduce the cook time to 20 to 25 minutes.
Instant pot hummus

Ingredients for Instant Pot hummus

Once you’ve cooked the chickpeas, this Instant Pot hummus is a breeze to whip up! You’ll need a food processor for this task (a blender doesn’t get it smooth enough!). Here’s what you’ll need on hand:

  • Cooked chickpeas
  • Garlic
  • Tahini
  • Fresh lemon juice
  • Ground coriander A fun variation on the standard cumin! we loved this
  • Kosher salt
  • Olive oil
  • Water, as needed

A bit about tahini

If you’ve never made hummus before, you’ll need a jar of tahini! Tahini is sesame seed paste that’s most famous for its use in hummus, but it’s used in lots of Middle Eastern and Mediterranean recipes (like lemon tahini sauce!). Since it’s simply made of sesame seeds and salt, tahini is vegan, vegetarian, gluten free, Paleo, keto, and Whole 30 friendly.

If you buy a jar of tahini and aren’t sure how to use it up, we’ve got lots of ideas for you! See our top Delicious & Healthy Tahini Recipes, from hummus to cookies.

Instant pot hummus

More Instant Pot recipes

What else can you make with an Instant Pot? So many things! Alex and I originally weren’t into the pressure cooker trend…until we tried it for ourselves! Here are a few of our favorite ways to use an Instant Pot:

This Instant Pot hummus recipe is…

Vegetarian, vegan, plant-based, dairy-free and gluten-free.

Print
Instant pot hummus

Creamy Instant Pot Hummus


1 Star2 Stars3 Stars4 Stars5 Stars (5 votes, average: 5.00 out of 5)

  • Author: Sonja Overhiser
  • Prep Time: 30 minutes
  • Cook Time: 35 minutes
  • Total Time: 1 hour 5 minutes
  • Yield: 2 1/2 cups
  • Diet: Vegan

Description

This Instant Pot hummus is super creamy and easy to make from scratch using a pressure cooker! You’ll be hooked on the flavor.


Ingredients

For the chickpeas

  • 1 cup dry chickpeas*
  • Water
  • 1 pinch salt

For the Instant Pot hummus

  • 2 cups cooked chickpeas
  • 1 garlic clove
  • 1/4 cup tahini
  • 5 tablespoons lemon juice (2 medium lemons)
  • 1 teaspoon ground coriander
  • 1 teaspoon kosher salt
  • 1/4 cup olive oil
  • Water, as needed

Instructions

  1. Place the chickpeas in the Instant Pot, cover with 2 inches water, and add the kosher salt. Lock the lid and place the vent in the “Sealing” position. (If you want to cook 1 pound chickpeas at once, go to Instant Pot Chickpeas instead!)
  2. Cook on high pressure 35 minutes (unsoaked) or 25 minutes (soaked): Note that it takes about 10 minutes for the pot to “preheat” and come up to pressure before it starts cooking. Wait while the Instant Pot cooks. (During cooking, avoid touching the metal part of the lid.)
  3. Natural release for 20 minutes: After the Instant Pot beeps, wait for another 20 minutes to let the Instant Pot naturally release pressure. (Tip: We set a timer for this part so we don’t forget!) After 20 minutes, vent any remaining steam by moving the vent to “Venting”, covering your hand with a towel or hot pad. Never put your hands or face near the vent when releasing steam. (The pressure indicator in the lid may drop on its own after 10 minutes, meaning that there is no remaining steam in the pot.)
  4. In the bowl of a food processor, add 2 cups of the cooked chickpeas. (You’ll have a few left over, which you can use for another recipe.) Add the garlic, tahini, lemon juice, coriander, and 1 teaspoon salt. Pulse until smooth, scraping the bowl occasionally. 
  5. Turn on the processor and pour in the olive oil until a smooth paste forms, then add water to get to a creamy consistency (we added 10 tablespoons). Process for 3 to 4 minutes until super creamy and smooth. Taste and add additional salt as needed. Store refrigerated for up to 4 to 5 days. 

Notes

Reprinted with permission from Instant Family Meals by Sarah Copeland, copyright © 2020. Photographs by Christopher Testani. Published by Clarkson Potter, a division of Penguin Random House, LLC. 

*If you can, soak the chickpeas for 10 to 12 hours the night before. This decreases the cook time and makes for more tender beans. But you can also do it without soaking and cook longer! 

  • Category: Appetizer
  • Method: Instant Pot
  • Cuisine: Pressure Cooker

Keywords: Instant Pot hummus, hummus instant pot

A Couple Cooks - Healthy, Whole Food, & Vegetarian Recipes


from A Couple Cooks https://ift.tt/3n0qTmL

Butternut Squash Mac and Cheese

This creamy, dreamy butternut squash mac and cheese is so tasty! It boasts less cheese and more fiber and vitamins than the standard.

Butternut squash mac and cheese

Welcome to our new favorite way to use butternut squash in a recipe. Butternut squash mac and cheese! Why add this mighty squash to your favorite pasta? Well, three reasons. The first is simply to have an excuse to use this fall ingredient in your kitchen! Butternut squash also lets you use less cheese and adds fiber to this traditionally starchy dish. But most of all…it’s just delicious. The squash gives the cheese sauce a sweet undertone and makes it extraordinarily creamy. Ready to get started?

Ingredients in butternut squash mac and cheese

First things first: this butternut squash mac and cheese has cheese in it. Yep, it’s designed as a way to use less cheese: not no cheese altogether. If you’re looking for a vegan mac and cheese, head to our Vegan Green Chili Mac we wrote for Washington Post! It’s incredibly tasty. But if you’re on board for the less cheese, more fiber version: let’s go! Here are the ingredients you’ll need:

  • Butternut squash: Fresh is best: because it has the best flavor and texture!
  • Pasta: Any short shape works!
  • Olive oil
  • Vegetable broth
  • Spices: chili powder, nutmeg, salt and pepper
  • Milk
  • Cheese: there are a few different options: see below!
Butternut squash mac and cheese

3 advantages to making butternut squash mac and cheese!

What do you get when you add butternut squash to mac and cheese? So much goodness! Here are the particulars on this butternut squash mac and cheese:

  • Reduces the standard recipe by over 1000 calories! Compared to a standard homemade mac and cheese, this recipe removes half the cheese, all the butter and flour, and 1 cup of the milk. That’s a savings of over 1000 calories (or 125 calories per serving for 8 servings).
  • Adds fiber. 1 cup of butternut squash has 7 grams fiber (source), so each serving has about 12% of your daily need.
  • Adds Vitamin A, Vitamin Cm and other vitamins. 1 cup of butternut squash has 457% of your daily Vitamin A and 52% of your daily value of Vitamin C (source). You get half that in each serving of this butternut squash mac and cheese!

How to cut butternut squash: some tips!

Now, we know: cutting a butternut squash can be daunting. It is for us too! But over the years, we’ve developed some best practices that make it much less painful. Here are a few tips for how to cut the squash for this butternut squash mac and cheese:

  1. Watch the video: First, watch this quick video of How to Cut Butternut Squash.
  2. Use a serrated peeler: A serrated blade makes it easier to peel the tough skin than a normal vegetable peeler, which easily slips. Here’s the serrated vegetable peeler we use.
  3. Cut off the neck and chop it separately from the base: Don’t cut the entire squash together. Chop off the neck, then peel it and chop into squares! Do the same for the base. 
Roasted butternut squash

Can you substitute frozen butternut squash in mac and cheese?

Technically yes, but we don’t recommend it. You can use 4 cups frozen butternut squash in this recipe instead of fresh. However, fresh such better flavor that we don’t recommend frozen. Here’s what to know:

  • The flavor is much better with fresh. When it comes to fresh vs frozen squash: fresh is better every time. Frozen is not nearly as flavorful: but it does work in a pinch!
  • Make these changes with frozen if you must: Use only 1 1/2 cups veggie broth for simmering and simmer for 5 minutes until the squash is tender. Omit the milk. Add additional kosher salt to taste. But instead of frozen butternut squash, we recommend this…

Meal prep tip: peel and dice the squash in advance!

If you do want to speed up this recipe: don’t use frozen squash. Simply peel and dice the butternut squash in advance! You can place it in a sealed container and refrigerate until you make the recipe, 2 to 3 days. It makes the recipe so much easier!

What cheese to use

There are lots of options for the cheese in this butternut squash mac and cheese! Here are a few options, in order of our preference:

  • Smoked gouda. It’s unique, but it adds a smoky nuance to the flavor and makes it taste completely irresistible.
  • Sharp cheddar. This one is the classic mac and cheese choice. It’s always tasty and you can combine it with the two cheeses below.
  • Monterey jack (with cheddar): Monterey jack is a great choice to mix with cheddar: it adds just the right cozy comfort food vibe. Go half cheddar and half Monterey jack.
Butternut squash mac and cheese

Variation: make it gluten free!

Another plus for butternut squash mac and cheese: it’s easy to make gluten free. Many mac and cheese recipes use flour and butter to make a roux, a way to thicken a cheese sauce. It makes for a lusciously creamy sauce, but it does have flour. This recipe is simple to make gluten free with a simple swap of pasta. You can use:

  • Gluten free pasta made with gluten-free flour
  • Legume pasta made with lentil or chickpea flour. This type of pasta alternative is becoming easy to find at your local grocery.

Ways to serve with butternut squash mac and cheese

Make the pasta, make the sauce, and bam: you’ve got a delicious and healthy dinner idea! How to round out the meal? We’d suggest adding a quick and easy vegetable to add even more fiber and nutrients. Some serving suggestions for butternut squash mac and cheese:

Butternut squash mac and cheese

This butternut squash mac and cheese recipe is…

Vegetarian. For gluten-free, use gluten free pasta or legume pasta.

Print
Butternut squash mac and cheese

Butternut Squash Mac and Cheese


1 Star2 Stars3 Stars4 Stars5 Stars (5 votes, average: 5.00 out of 5)

  • Author: Sonja Overhiser
  • Prep Time: 20 minutes
  • Cook Time: 20 minutes
  • Total Time: 40 minutes
  • Yield: 6 to 8 as a main, 10 to 12 as a side
  • Diet: Vegetarian

Description

This creamy, dreamy butternut squash mac and cheese is so tasty! It boasts less cheese and more fiber and vitamins than the standard.


Ingredients

  • 1 pound small pasta shells* (gluten free or legume pasta as desired)
  • 4 cups peeled and diced butternut squash** (about 1 medium squash: not frozen!)
  • 3 garlic cloves
  • 2 tablespoons olive oil or butter
  • 2 cups vegetable broth 
  • 1/2 teaspoon chili powder
  • 1/8 teaspoon ground nutmeg
  • 3/4 teaspoon kosher salt, plus more to taste
  • Freshly ground black pepper
  • 1/2 cup 2% milk
  • 2 cups (8 ounces) shredded smoked gouda cheese (or sharp cheddar cheese, or equal parts cheddar and Monterrey Jack)
  • Seasoned Italian breadcrumbs or plain breadcrumbs, optional

Instructions

  1. Prep the squash and garlic: Peel and dice the butternut squash. Mince the garlic.
  2. Cook the pasta: Start a pot of well salted water to a boil. Boil the pasta until it is just al dente. Start tasting a few minutes before the package recommends: you want it to be tender but still a little firm on the inside; usually around 7 to 8 minutes. Drain the pasta. (If it finishes before the sauce, add it back to the pot with a drizzle of olive oil so it doesn’t stick.)
  3. Make the sauce: In a large skillet, heat the olive oil over medium-low heat; add the garlic and sauté for 1 to 2 minutes, or just until the garlic is fragrant but not browned. Carefully add the squash and vegetable broth to the skillet and stir to fully combine. Add the chili powder, nutmeg, kosher salt, and several grinds of black pepper. Cover and bring it to a high simmer, bubbling constantly, then cook 20 minutes until the squash is tender. 
  4. Blend the sauce: Carefully add the squash and all liquid to a blender. Add the milk and blend until smooth. Pour the sauce back into the pot. Stir in the shredded cheese and stir with a spoon until it is melted (gently heat it over low heat if it doesn’t melt right away). Taste and add additional salt as desired.
  5. Serve: Pour the sauce onto the pasta. Taste and add a few more pinches salt as necessary. Serve immediately, sprinkled with breadcrumbs if desired.

Notes

*We like making half the pasta (8 ounces) and saving half the sauce for later to make with fresh pasta.

**Using frozen squash is not nearly as flavorful. To save prep time, peel and dice the squash in advance, and refrigerate it until making the recipe (up to 2 days).

  • Category: Main Dish
  • Method: Stovetop
  • Cuisine: American

Keywords: Butternut squash mac and cheese

More butternut squash recipes

Butternut squash is a winter squash with personality! It turns everything to gold. Here are a few more butternut squash recipes:

A Couple Cooks - Healthy, Whole Food, & Vegetarian Recipes


from A Couple Cooks https://ift.tt/33QfU7L

Chocolate Chip Cookie Dough Fudge

An easy, no-bake holiday treat, this cookie dough fudge is soft and creamy, with hints of vanilla and brown sugar and studded with mini chocolate chips, the same flavors that make chocolate chip cookie dough so irresistible.

If you’re obsessed with cookie dough like I am, you’re going to want to make this recipe STAT. It’s literally a slab of cookie dough flavored-fudge, but without the worry of raw cookie dough since it’s made without eggs and with heat-treated flour.

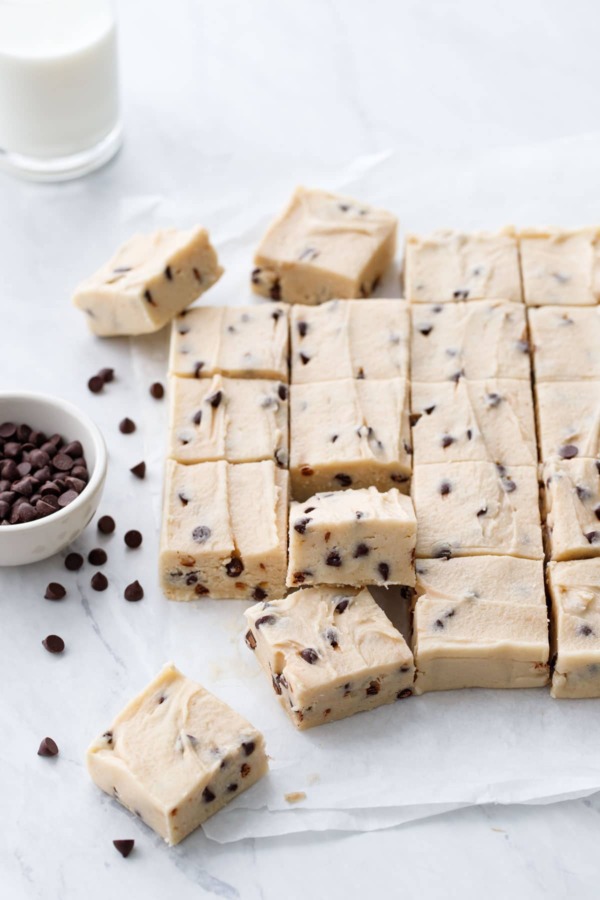
Cut pieces of Chocolate Chip Cookie Dough Fudge on parchment, with a glass of milk and bowl of mini chips

This recipe was originally published in my first cookbook over 8 years ago (Can you believe it’s been that long? I can’t!) It’s one of the handful of recipes that has really made its mark on the Internets, with dozens of bloggers having posted their versions (and that makes me so so happy). I’ll be honest I hadn’t made it myself since I made the final batch for the photo shoot, and decided it was high time I revisit this cookie dough classic. Because, y’all, I forgot just how good this ish is.

I vaguely recall the testing process for this recipe being nothing short of a disaster, having first attempted an old-fashioned brown sugar fudge somewhat like penuche I think it’s called? If I recall correctly, I threw out at least 3 or 4 full pans of too soft, too grainy, or oddly hard fudge before I finally decided to go in a different direction.

The final recipe is what I call shortcut, or cheater fudge, which uses powdered sugar rather than boiled sugar for structure. Combined with some milk, melted butter and brown sugar, and then a healthy glop of raw, eggless cookie dough and mini chocolate chips folded right in, it has the texture of your favorite holiday fudge, but the flavor of straight up chocolate chip cookie dough.

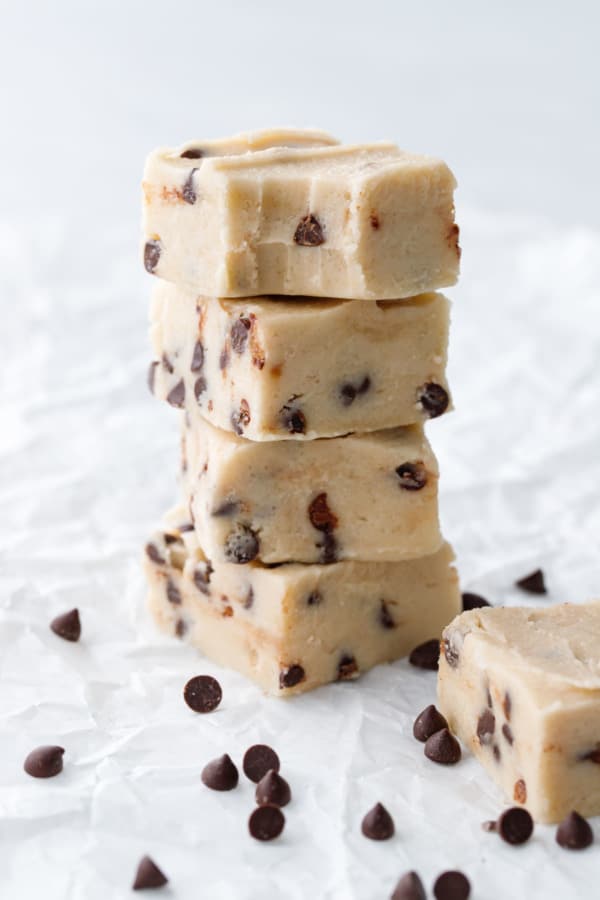
Stack of Chocolate Chip Cookie Dough Fudge, top piece with a bite out of it

The texture is definitively fudge-like, with just a hint of graininess from the raw sugar in the cookie dough (I’d argue this texture is part of the appeal of cookie dough to begin with.) Preserving that texture is one of the reasons this is a two part recipe (folding in the raw cookie dough into the fudge base, rather than melting all the ingredients together in one pot which might taste the same, but would not have the same texture).

Mini chocolate chips give the chocolate a more even distribution, and a better balance of cookie dough to chocolate in each bite.

(more…)


from Love and Olive Oil https://ift.tt/37I6RXD

Baked Brie

Baked brie recipe is one of the best easy appetizers around! Bake it in 15 minutes and add your favorite toppings for a total crowd pleaser.

Baked brie

Some people claim a recipe can be too easy. We think not. I don’t know about you, but we’re always in need of easy ideas…like this Baked Brie! There could not be an easier appetizer recipe, folks. But often, we forget about these simple entertaining tricks. So here’s what you need to know about making a melty, delicious pile of brie. The great part? The toppings are versatile depending on your preferences, and you can make a beautiful platter with little effort. Here’s what to do!

How to bake brie

Making baked brie is so easy, you barely need a recipe. But we’re of the mindset that there’s nothing too simple to jot down as an idea for cooking inspiration. (Heck, we even wrote a book about simple recipes.) You can go to the recipe below for the full details, or just memorize this easy formula for how to bake brie:

  • Preheat the oven to 375 degrees.
  • Place the brie on a baking sheet or dish.
  • Bake for about 15 minutes! To test whether it’s done, touch your finger in the middle of the brie. It should feel like it’s completely liquid in the center.

Yes, that’s literally zero hands on time to bake brie! Then you’ll need a few minutes to dollop the cheese with toppings. Here’s what we like to use…

Baked brie recipe

Baked brie toppings!

Yes, baked brie is that easy to make. We love it for parties and entertaining, especially when we’re making multiple recipes at once and need something simple yet stunning. The toppings are the fun part for baked brie: you can customize this recipe according to your tastes and make dozens of variations. One key to topping this melty cheese: sweet is an ideal pair with gooey, savory cheese. Here are some ideas for baked brie toppings:

What do you add to your baked brie? Let us know in the comments below!

Variation: cover it in puff pastry

One popular variation on baked brie is to cover it in puff pastry. If you make it this way, you don’t need any toppings. Our personal opinion? We think puff pastry is unnecessary: it adds extra effort, calories, and makes it a little harder to eat. But, you can absolutely add it if you love this 1970’s style appetizer idea! Here’s the basic idea:

  • Cut the top skin off the brie wheel.
  • Get a large sheet of puff pastry. Lay it out in a single layer and place the brie on top.
  • Add a few tablespoons of jam on top of the brie.
  • Fold the pastry up and over the brie and cut off any excess dough.
  • Bake about 25 to 30 minutes at 375 degrees until the pastry is golden brown. Cool a few minutes before serving.
How to bake brie

How to serve this baked brie recipe

How to serve baked brie? Well, the sky’s the limit! There are so many things you can add to this luscious cheese wheel to make a beautiful appetizer spread. It’s great for entertaining at any type of gathering: Christmas, Thanksgiving, or just any type of party! Here are some ideas:

  • Crackers (try homemade)
  • Crostini (try homemade)
  • Gluten free crackers or bread substitutes
  • Baguette slices
  • Apple slices
  • Pear slices
  • Grapes
  • Apricot or cranberry jam (if not using as a topping)
  • Rosemary sprigs, for decoration

More easy appetizers to pair

This baked brie is the perfect centerpiece for an appetizer spread! In fact, we created it in part for a virtual cocktail party with our friend Sierra. Here are a few of the other easy appetizers we’d pair with it to make a delicious spread. In fact, you could even use this as an “appetizer dinner,” which we like to do for an easy meal concept. Here’s what we’d pair:

Baked brie

This baked brie recipe is…

Vegetarian and gluten-free (with gluten-free crackers or bread substitutes).

Print
Baked brie

Baked Brie (Recipe & Tips!)


1 Star2 Stars3 Stars4 Stars5 Stars (6 votes, average: 5.00 out of 5)

  • Author: Sonja Overhiser
  • Prep Time: 0 minutes
  • Cook Time: 15 minutes
  • Total Time: 15 minutes
  • Yield: 8
  • Diet: Vegetarian

Description

Baked brie recipe is one of the best easy appetizers around! Bake it in just 15 minutes and add your favorite toppings for a stunning crowd pleaser.


Ingredients

  • 1 brie cheese wheel
  • Honey or cranberry, cherry or apricot jam or preserves
  • Chopped pistachios, walnuts or pecans
  • Sea salt
  • For the platter: crackers, crostini, baguette slices, 

Instructions

  1. Preheat the oven to 375°F. Place the brie in a baking dish or on a parchment-lined baking sheet. Bake for 15 minutes until soft and warm: it’s done when you touch the center with your finger and it feels very liquid inside. 
  2. Top with honey or jam and crushed pistachios. Surround with crackers or crostini, grapes, apple, pear, etc.
  • Category: Appetizer
  • Method: Baked
  • Cuisine: American

Keywords: Baked brie, Baked brie recipe, How to bake brie

A Couple Cooks - Healthy, Whole Food, & Vegetarian Recipes


from A Couple Cooks https://ift.tt/3g41ndz

Raspberry Red Pepper Jelly

Sweet and spicy and fruity: that’s what this jelly is made of! With just the right amount of spice, balanced with sweetness and fruitiness ...