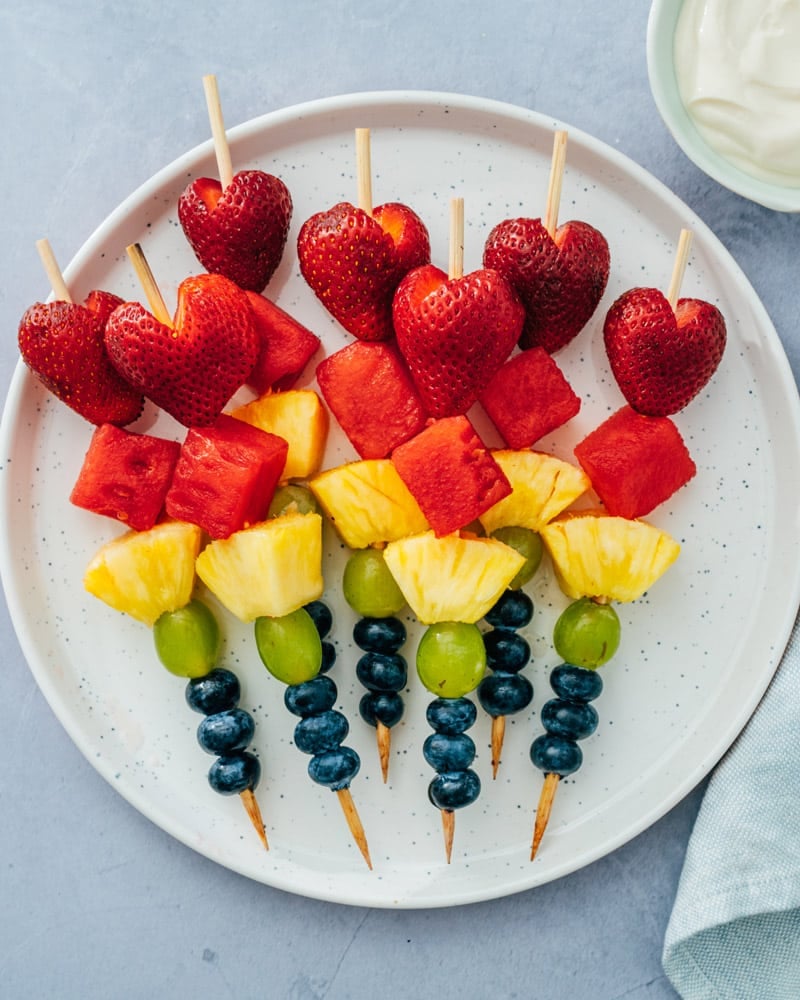
Fruit skewers are a fun and festive appetizer or snack! This healthy treat is easy to make and pleases everyone.

Looking for a fun appetizer idea or healthy snack? Try Fruit Skewers! Everything tastes better on a stick, right? This is a simple concept that’s more like an idea than a recipe: but it makes everyone go crazy for pure, fresh fruit. Use whatever fruits you like and if desired, serve with our favorite 3 ingredient fruit dip! The skewers are perfect for a summer appetizer, snack ideas or even a healthy dessert. We recently served these after a summer meal al fresco and it was the perfect after-dinner treat!
Ingredients for fruit skewers
Fruit skewers work with just about any fruit: so you can get as creative as you like! There are a myriad of artistic ways to combine fruits and thread them onto skewers. For our version, we picked fruits our family loves: because to be honest, we’ve got a few picky fruit people (sorry cantaloupe, you’re not a fave!). Here’s what we chose and a few other ideas:
- Strawberries
- Watermelon
- Pineapple
- Grapes
- Blueberries
- 12-inch wooden skewers
- Other fruits that work well: Cantaloupe, oranges, kiwi, honeydew melon, purple grapes, blackberries, and raspberries

Tips for threading fruit skewers
It’s easy to make fruit skewers and you can go in many different directions! Choose a rainbow of fruit, or go more monochrome with just 2 or 3 colors of fruit. The way you cut the fruit changes the look as well! Here are a few tips and ideas for threading the skewers:
- A 12-inch skewer or smaller is a nice size. Avoid skewers that are very long as they are awkward to eat off of (especially for children).
- Pre-cut fruit makes for quick prep. We got pre-cut pineapple and watermelon here, which is easy to find in the produce section of your grocery store. Or you can cut from the larger fruits: here’s how to cut pineapple and how to cut watermelon.
- If desired, cut strawberries into a heart shape. Cut a notch into the top when you remove the stems, and you’ve got an instant heart shape! It looks nice on a skewer.
- Determine a theme. Are you going rainbow? Red white and blue? Anything goes in skewer-land: just get creative.
- Use cookie cutters. Want to get over-the-top cute? Use cookie cutters to cut shapes into watermelon or cantaloupe (like stars or hearts).
Serve with fruit dip if desired
It’s optional, but we love serving fruit skewers with our famous 3 ingredient fruit dip. It’s so simple whip up and tastes incredible: tangy, lightly sweet and perfect for fruits of all kinds. All you’ll need is Greek yogurt, maple syrup or honey, and vanilla extract. Head to the recipe below: and we promise it will become a favorite in your house! We’ve got it memorized over here.

More easy appetizer recipes
These fruit skewers are perfect as a summer appetizer: but they work in any season and for any occasion! They’re also perfect for healthy snacks and even a refreshing treat after a meal. Here are a few more fun appetizers you’ll love:
- Try fresh and easy Caprese Skewers
- Opt for Italian-inspired Antipasto Skewers
- Go for Tequila Watermelon Skewers
- Grab Apple Nachos or Easy Yogurt Bark


This fruit skewers recipe is…
Vegetarian, gluten-free, vegan, plant-based and dairy-free (without the dip).
Print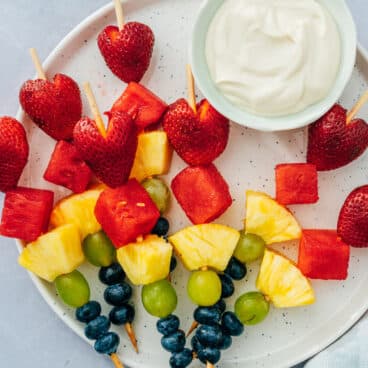
Fruit Skewers
 Prep Time: 15 minutes
- Cook Time: 0 minutes
- Total Time: 15 minutes
 Yield: 16 skewers
Description
Fruit skewers are a fun and festive appetizer or snack! This healthy treat is easy to make and pleases everyone.
Ingredients
For the fruit skewers
- 16 strawberries
- 16 watermelon chunks (fresh or pre-cut)
- 16 pineapple chunks (fresh or pre-cut)
- 16 green grapes
- ¾ cup blueberries
For the fruit dip (optional)
- 1 cup Greek yogurt
- 2 tablespoons pure maple syrup or honey
- ½ teaspoon vanilla extract
Instructions
- Cut a notch into the strawberries to remove the stems and create a heart shape (see photos). If necessary, cut the pineapple and cut the watermelon into bite-sized chunks (buying pre-cut fruit makes for speedy prep).
- Thread the fruit onto 12-inch wooden skewers.
- If desired, make the dip: stir together the Greek yogurt, maple syrup or honey, and vanilla extract. Serve immediately or refrigerate up to 1 day before serving.
 Category: Appetizer
 Method: No Cook
 Cuisine: American
- Diet: Vegetarian
Keywords: Fruit skewers
A Couple Cooks - Recipes worth repeating.
from A Couple Cooks https://ift.tt/T9SXOUt