Spanish Coffee

Try this homemade Spanish coffee recipe! The showy after dinner drink features Kahlua, rum, orange liqueur, and a caramelized sugar rim.

Spanish coffee

Have you tried the revelation that is Spanish coffee? Flaming Spanish coffee, that is? The name is a bit of a misnomer. It’s actually an American spin on the Spanish concept of carajillo: spiked coffee. But this drink is extra-special. It’s got a caramelized sugar rim and is spiked with Kahlua, rum, and orange liqueur…and topped with hand-whipped fluffy whipped cream! The burnt caramel, citrus, bitter coffee and sweet cream all combine into a literal symphony of flavor. You’ve gotta try this one!

What is Spanish coffee?

Why’s it called Spanish coffee, when it’s really American? Well, the concept of spiked coffee spans cultures and liquors, from traditional Irish coffee to amaretto coffee. The Spanish version of spiked coffee is called carajillo, and it’s popular in Spain and Latin American countries like Cuba, Colombia and Mexico. Each country uses its own liqueur; in Spain it’s brandy; in Mexico it’s Licor 43, a bright yellow vanilla liqueur.

Spanish coffee is an American adaptation of the carajillo, invented at Huber’s Bar in Portland, Oregon. The drink is made tableside by lighting high proof rum on fire to caramelize the glass’s sugar rim. Then the glass is filled with coffee, Kahlua and Triple Sec, and topped with whipped cream and nutmeg. It’s a true dramatic spectacle designed to put on a show: and we’ll admit this drink is totally worthy of it.

Spanish coffee recipe

Ingredients & equipment for Spanish coffee

Here are the ingredients and equipment you’ll need to make a Spanish coffee recipe at home. We’ve created a method that’s easiest for home preparation of this flaming drink: but there are a few different options! The Spanish coffee ingredients are:

  • Coffee: any strong coffee will do, using your favorite brewing method
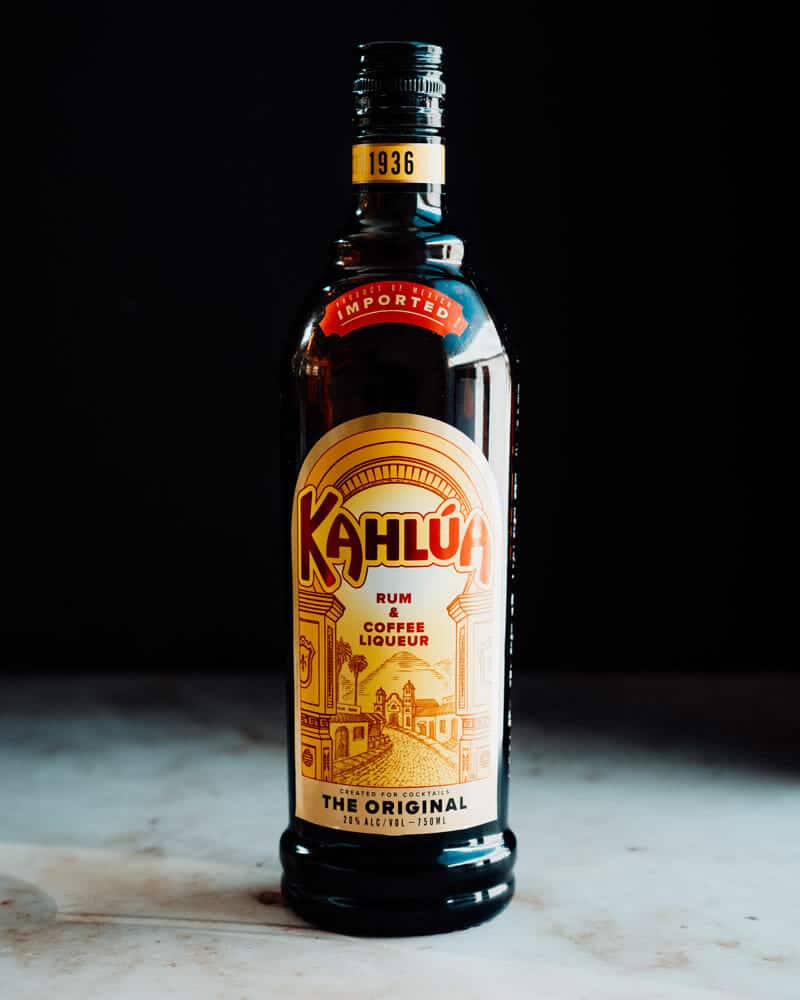
  • Kahlua or any coffee liqueur like Tia Maria
  • Triple Sec or any orange liqueur like Cointreau or Grand Marnier
  • Rum: use aged rum for the home method, or 151 rum for the bar method
  • Sugar and a lemon: to make the rim
  • Homemade whipped cream: you’ll need heavy whipping cream and powdered sugar, or use vegan whipped cream for vegan
  • Kitchen torch for home method (here’s a good one), lighter for bar method

How to make the caramelized rim… two methods!

This Spanish coffee recipe calls for lighting rum on fire to make the caramelized glass rim. Now, we’re always up for playing with fire at home (safely, mind you). But when we tried this trick using our thick glass Irish coffee mug, it shattered when the coffee was poured in! The flaming method also takes a bit of practice, and it’s not practical for a crowd.

Because of this, we prefer to use a kitchen torch for our method: like the kind you’d use to caramelize crème brulee. Here’s more about the two methods:

  • The best method for homemade Spanish coffee is a kitchen torch. This ensures your glass won’t break (like ours did)! It’s also safer, which is a big plus. And it’s faster and easier to make multiple servings for a crowd.
  • Don’t have a kitchen torch? Here’s the kitchen torch we use and it’s only $15. You can also just skip the caramelized rim altogether: it’s still extra delicious without it. Or, try the bar method…
  • The traditional bar method uses 151 rum and a lighter. If you want to try the traditional method, go for it! To get it to light you’ll need 151 rum, a higher proof alcohol than the standard. Go to the recipe below for our pointers! Use a thin glass so the caramelization happens quickly; thicker glasses take longer, get hotter, and then have the possibility of shattering like ours did.

Note: If you end up buying a kitchen torch, you can use it for so many things! Try it for caramelizing creme brulee, charring crust on a pizza to look like a wood-fired oven (our favorite trick!), or melting cheese on nachos (to add smoky flavor).

Kahlua

Homemade whipped cream: a few tips

Sure, you can buy Cool Whip. But if you’re going to the trouble of making a Spanish coffee recipe, homemade whipped cream takes it up a notch! You’ll just need heavy whipping cream and powdered sugar to sweeten it. it takes only a minute or two to whisk up by hand. Or, you can use coconut cream or coconut milk as a dairy-free option. Here are the various methods:

  • Classic whipped cream: Use this Homemade Whipped Cream recipe. Make sure to use the freshest of cream, which whips the fastest and has the best texture. (Old cream gets too dense.) Whip it to soft peaks, which makes just the right texture for floating on top of a drink. When you add it to the top, do so over the back of a spoon, which helps it to balance on top.
  • Dairy-free whipped cream: Use this Dairy Free Whipped Cream recipe. Keep in mind you’ll need to refrigerate 1 can of coconut milk overnight. Or, you can substitute coconut cream with no need for refrigeration.
Spanish coffee

How to make Spanish coffee

Now that you’ve got your kitchen torch and selected your whipped cream method…this Spanish coffee recipe is a breeze! Here’s the general outline of the steps (or jump to the recipe below):

  • Make your coffee.
  • Make the whipped cream, making sure to whip to soft peaks.
  • Rim the edge of the glass with a 1/2-inch band of sugar. This allows for maximum burnt caramel flavor. Or, skip this step: the drink will still taste delicious!
  • Use a kitchen torch to caramelize the sugar. It should take just a minute or so.
  • Add coffee, Kahlua, Triple Sec and rum.
  • Top with whipped cream. Again, adding it over the back of a spoon helps it to float on top. Enjoy!

Variation that’s even easier: the Carajillo!

If you like this Spanish coffee recipe, you’ll love a Mexican-style Carajillo. As we mentioned, Spanish coffee is actually an American adaptation of this Spanish invention. But Carajillo is also very popular in Mexico, where they spike the coffee with Licor 43 instead of brandy.

Licor 43 is a bright yellow vanilla liqueur made with 43 herbs and spices. Add it to coffee, and it’s got loads of nuance and intrigue. If you top with whipped cream like the Spanish coffee, the two taste very similar. We’d highly recommend giving it a try: or making it instead of this recipe if you’re scared off by the caramelized rim. Go to Carajillo (Mexican Spiked Coffee).

Spanish coffee recipe

More after dinner drinks

There are so many other tasty after dinner and dessert drinks to try in addition to Spanish coffee! Here are some favorites:

When to serve Spanish coffee

Spanish coffee is a showy dessert drink for sipping on after a meal! Serve it as a:

  • After dinner drink
  • Happy hour drink
  • Signature drink
  • Girls or guys night drink
  • Cocktail hour drink
Print
Spanish coffee

Spanish Coffee


1 Star2 Stars3 Stars4 Stars5 Stars (5 votes, average: 5.00 out of 5)

  • Author: Sonja Overhiser
  • Prep Time: 5 minutes
  • Cook Time: 0 minutes
  • Total Time: 5 minutes
  • Yield: 1 drink
  • Diet: Vegetarian

Description

Try this homemade Spanish coffee recipe! The showy after dinner drink features Kahlua, rum, orange liqueur, and a caramelized sugar rim.


Ingredients

  • 3 ounces* coffee
  • 2 ounces Kahlua
  • 1/2 ounce Triple Sec (or other orange liqueur)
  • 1/2 ounce aged rum (or white or dark)
  • Granulated sugar, for dipping the glass
  • Lemon wedge
  • 1 large spoonful sweetened whipped cream (or vegan whipped cream), whipped to soft peaks
  • For the garnish: grated chocolate or fresh grated or ground nutmeg

Instructions

  1. Make the coffee. Allow it to cool slightly while preparing the drink.
  2. Make the homemade whipped cream, whipping it to soft peaks.
  3. Use a lemon wedge to wet a 1/2-inch of the rim of the glass and dip the outside in sugar to make a 1/2-inch band. 
  4. Use a kitchen torch** to caramelize the outside of the glass until the sugar turns brown. 
  5. Add the coffee, Kahlua, triple sec and rum and stir once. 
  6. Gently float the whipped cream on top using the back of a spoon. Garnish with grated chocolate or nutmeg.

Notes

*If converting to tablespoons, 1 ounce = 2 tablespoons.

**The traditional method is to place 3/4 ounce 151 rum in the glass first, light it on fire, and tilt the glass to allow the sugar to caramelize. This method doesn’t require a torch, but if you use a thicker glass like an Irish coffee mug it can shatter (which happened to us!). The torch method is safer and makes it easier to serve this drink for multiple people. You can also omit the sugar rim if you prefer; the flavor is still great. Or, you can try the traditional method at your own risk; if you do, add the 151 rum, caramelize the edge, then add the coffee, Kahlua, and Triple Sec (omit the aged rum).

  • Category: Drink
  • Method: Stirred
  • Cuisine: Cocktails

Keywords: Spanish coffee

A Couple Cooks - Healthy, Whole Food, & Vegetarian Recipes


from A Couple Cooks https://ift.tt/3uv1g1y

Classic Tuna Pasta Salad

This tuna pasta salad recipe is creamy and satisfying! It’s a protein-packed quick and easy dinner or make ahead lunch.

Tuna pasta salad

There’s a magical meal fix out there, and we’re here for it. It’s a can of tuna. That sounds a little 1960’s, right? But there’s a reason why canned tuna was so popular in previous decades. It’s a cheap protein that’s super shelf stable. And you can transform it into seriously tasty meals: like this nostalgic Tuna Pasta Salad! It’s creamy but not too rich, with a splash of white wine vinegar and a sprinkle of dried dill. It’s a seriously simple pantry meal that gives us cozy nostalgic vibes…and it works as a make-ahead lunch too. Here’s more about it!

Ingredients in tuna pasta salad

This tuna pasta salad is a retro style recipe with a modern spin! We tried to take all that’s good about tuna pasta salad of the past, without the gloppy, overly rich mayonnaise. This recipe uses about half the mayo than the 1970’s version, so it’s just creamy enough. Here’s what you’ll need:

  • Tuna, packed in water
  • Pasta: short noodles of any type
  • Frozen peas
  • Mayonnaise
  • Red onion
  • Green onion (or substitute onion powder)
  • Mayonnaise
  • White wine vinegar
  • Dried dill
  • Feta cheese, optional

It’s so easy to make this recipe: literally just boil the pasta and mix together the pasta salad ingredients. It’s mind-blowingly simple and uses mostly pantry ingredients! The only refrigerated ingredient is the green onion, which is optional. A few notes on storage, though…

Tuna pasta salad

Make it even creamier, if desired

Love a super creamy tuna pasta salad? The amount of mayo we’ve used here is about 1/2 the amount of a traditional super creamy pasta salad. You can add one of two things to this pasta salad to get an even creamier texture:

  • Add 1/4 cup Greek yogurt. We love using Greek yogurt in combination with mayo to get extra creamy sauces with less calories (like our Ranch Dressing). Do this if you’re going to eat it right away. But if you’re planning on leftovers, don’t use the Greek yogurt! The texture gets gummy in the fridge (see below).
  • Add 1/4 cup sour cream. Sour cream has a nice rich texture that doesn’t get quite as gummy as Greek yogurt in the fridge. The downside? it’s got a few more calories. If you’re going for a splurge, it makes for a nice creamy texture.

Eat immediately, or use as a make ahead lunch

This tuna pasta salad is best immediately, in our opinion! We usually eat it for dinner with some sides (see below). If you’d like, you can make it ahead for lunches throughout the week! Here’s what to know:

  • Refresh the texture and flavor before serving. This pasta salad can become drier in the refrigerator. We suggest swirling in a little mayo or sour cream before eating, and refresh with a few pinches of salt if you like. The added sour cream option above is nice if you’re wanting creaminess to hold up over several days.
  • Allow it to come to room temperature before serving. This one is best at room temp; it’s not designed as a cold pasta salad.
Tuna pasta salad recipe

Make tuna pasta salad into a meal!

This tuna pasta salad is the perfect pantry meal: with a few simple items, you’ve got dinner! It’s especially perfect for snow days or evenings where you just don’t have the energy to think. Here are a few ways you can accessorize it for lunch or dinner:

More tuna recipes

Tuna to the rescue! Canned tuna is great for throw-together pantry meals. Here are a few more of our canned tuna faves:

Tuna pasta salad

This tuna pasta salad recipe is…

Pescatarian. For gluten-free, use gluten free or legume pasta.

Print
Tuna pasta salad

Classic Tuna Pasta Salad


1 Star2 Stars3 Stars4 Stars5 Stars (5 votes, average: 5.00 out of 5)

  • Author: Sonja Overhiser
  • Prep Time: 10 minutes
  • Cook Time: 10 minutes
  • Total Time: 20 minutes
  • Yield: 4

Description

This tuna pasta salad recipe is creamy and satisfying! It’s a protein-packed quick and easy dinner or make ahead lunch.


Ingredients

  • 8 ounces pasta: shells or bowties (farfalle)
  • 1 cup frozen peas
  • 3 green onions (or 1/4 teaspoon onion powder)
  • 1/4 cup minced red onion
  • 2 5-ounce cans tuna
  • 1/2 cup mayonnaise*
  • 1 1/2 tablespoons white wine vinegar
  • 1/2 teaspoon dried dill
  • 1/2 teaspoon kosher salt
  • Optional: 1/2 cup feta cheese crumbles

Instructions

  1. Cook the pasta (and peas): Start a pot of salted water to a boil. Boil the pasta until it is just al dente. Start tasting a few minutes before the package recommends: you want it to be tender but still a little firm on the inside; usually around 7 to 8 minutes. In the last 1 minute, add the peas. Drain the pasta and peas, then rinse with cold water. 
  2. Prep the remaining ingredients: Meanwhile, thinly slice the green onions. Mince the red onion. Drain the tuna and flake it with a fork. Place them in a large bowl with the mayonnaise, white vinegar, dill, and kosher salt
  3. Mix: Once the pasta and peas are cooked, add them to the bowl and mix. Taste and adjust flavors if desired, adding black pepper as necessary. Serve immediately. Store leftovers refrigerated for up to 3 days: before eating, allow to come to room temperature. You may want to add a swirl of mayo or sour cream and a pinch of salt to refresh the texture and flavor. 

Notes

*Make a super creamy pasta salad by adding 1/4 cup Greek yogurt or sour cream. Only use Greek yogurt if you’re not planning to save leftovers; the texture can become gummy in the refrigerator. For saving over several days, sour cream is the best option. 

  • Category: Main dish
  • Method: Stovetop
  • Cuisine: Salad

Keywords: Tuna pasta salad, Tuna pasta salad recipe

A Couple Cooks - Healthy, Whole Food, & Vegetarian Recipes


from A Couple Cooks https://ift.tt/3dITzyH

Peanut Butter Energy Balls

This peanut butter energy balls recipe is the best easy snack! Healthy oatmeal balls pack protein and fiber into tasty bites.

Energy balls

Here’s a healthy snack that’s so delicious, you might find yourself sneaking one for dessert. Try this peanut butter Energy Balls recipe! Yes, we can’t stop riffing on combinations of peanut butter and oatmeal, though any nut butter works here. Just mix a handful of simple ingredients together and bam! You’ve got an instant homemade snack that’s infinitely more delicious than store-bought granola bars or energy bites. Even better, they’ve got a good amount of protein and fiber for a tiny ball. We think they’re pretty darn perfect.

Ingredients in the best energy balls recipe

These energy balls are quick and easy to make, and full of very simple ingredients you might already have on hand. That’s very intentional, in fact. Years ago, we used to make energy ball recipes with trendy Medjool dates, a large variety of date with a sticky sweet, caramel flavor. We love them, but they can be hard at the grocery and very expensive. Also, I burned Alex out on Medjool date energy bites (oops!).

Now we now want our energy balls recipes super simple. Oatmeal, peanut butter, and honey are things we always have on hand…so why not use them? They’re beyond easy to make: and kids love them too! Here’s what you’ll need for these peanut butter oatmeal balls:

  • Old Fashioned rolled oats
  • Creamy peanut butter: no sugar added! Use sunflower butter for nut free
  • Honey: substitute agave syrup for vegan
  • Kosher salt
  • Cinnamon
  • Vanilla or chocolate protein powder: see notes below
  • Mini chocolate chips: make sure to get mini-chips! They’re best for keeping the balls tightly packed
Peanut butter energy balls

How to roll peanut butter energy balls

This energy balls recipe could not be easier: all you have to do is mix together the ingredients and roll them up! It’s that simple. Want them to look as beautifully uniform as the energy balls in the photo? Here are a few tips on rolling these energy bites:

  • Freeze the dough 5 minutes before you roll. Just a few minutes in the freezer firms up the texture so it’s easy to roll.
  • Use a cookie scoop (1 1/2-inch or #40). This is the magic behind making them look so uniform! A cookie scoop is perfect for proportioning out the dough. Don’t have one? No problem, just approximate.
  • Use mini chocolate chips. Using mini chocolate chips helps the entire texture to stick together well: large chips can cause fractures.
Peanut butter oatmeal balls

Use any nut butter you like: and some troubleshooting tips

These don’t have to be peanut butter energy balls, of course. You can use any nut butter you like: almond butter, cashew butter, pecan butter, or sunflower butter for nut-free! Here are a few notes if you use a different nut butter:

  • Make sure to use a creamy nut butter. You’ll want a nut butter with a nice creamy texture that will make the energy balls stick together.
  • You can use homemade, but be aware of texture. You can use homemade nut butter, but be aware: some homemade versions can be very dry.
  • If it’s too dry, add a little more honey or a few tablespoons milk. If you can’t get the balls to stick together, it’s ok: all nut butters have a different consistency. Just add a little more honey or your milk of choice (dairy or non dairy) until the dough is able to stick together.

Are these healthy energy balls?

These peanut butter energy balls come out 1,000 times more delicious than a store-bought granola bar. And guess what? They’re fairly healthy too. You can get a decent amount of protein in a few balls (which would equal 1 store-bought energy bar). Here are the particulars:

  • Protein: Each energy bite has 3 grams of protein of 6% of your daily need.
  • Fiber: Each energy ball has 1 gram of fiber or 5% of your daily need.
  • Fat: Each energy bite has 4 grams of fat or 5% of your daily allotment.
  • Calories: Each ball has 100 calories.

Of course when it comes to healthy snacks, carrot sticks or a handful of almonds are the healthiest. But if you’re looking for something irresistibly tasty and

Energy balls recipe

What protein powder to buy (or omit it!)

Here at A Couple Cooks we don’t usually include protein powder in our recipes. But for these peanut butter oatmeal balls we wanted to maximize the overall protein content! If you prefer, you can definitely omit the

Alex did a little research into how to find healthy protein powder; here’s what we found:

Energy ball flavor variations!

There are so many ways to mix up this energy balls recipe! As we’ve mentioned above, no need to make them peanut butter oatmeal balls, though that’s our favorite way. Here are a few ideas on how to vary the flavors:

  • Almond joy: Use almond butter instead of peanut butter, and add 1/4 cup shredded coconut (so delicious!). Remember if your almond butter has a dry texture, add a little more honey or a few tablespoons milk until the dough comes together.
  • Birthday cake: Add 1/4 teaspoon almond extract and 3 tablespoons all natural sprinkles.
  • Cherry vanilla: Substitute dried cherries for the chocolate chips (roughly chopped) and 1/2 teaspoon vanilla extract.
  • Blueberry lemon: Substitute dried blueberries for the chocolate chips and add 1/2 teaspoon lemon zest.

There are so many more options…how would you customize these energy bites? Let us know in the comments below.

Peanut Butter Energy Balls

These peanut butter oatmeal balls are very similar to our oatmeal bars recipes! Because oatmeal, peanut butter and honey are the best classic combination, right? Try these fan favorite oatmeal bars:

This energy balls recipe is…

Vegetarian and gluten-free. For plant-based, dairy-free, and gluten-free, use agave syrup.

Print
Energy balls

Easy Energy Balls


1 Star2 Stars3 Stars4 Stars5 Stars (5 votes, average: 5.00 out of 5)

  • Author: Sonja Overhiser
  • Prep Time: 15 minutes
  • Cook Time: 0 minutes
  • Total Time: 15 minutes
  • Yield: 20
  • Diet: Vegetarian

Description

This peanut butter energy balls recipe is the best easy snack! Healthy oatmeal balls pack protein and fiber into tasty bites. 


Ingredients

  • 2 cups Old Fashioned rolled oats
  • 1/2 cup creamy peanut butter (no sugar added, or any nut butter or sunflower butter for nut free)
  • 1/3 cup honey (or agave syrup for vegan)
  • 1/4 teaspoon kosher salt
  • 1/4 teaspoon cinnamon
  • 1/4 cup vanilla or chocolate protein powder (we use this one)*
  • 3 tablespoons mini chocolate chips

Instructions

  1. Mix all ingredients together in a bowl. Freeze the bowl for 5 minutes. 
  2. Roll the dough into 20 small balls, pressing the dough together with your hands. We used a 1 1/2-inch cookie scoop (#40) to make uniform balls. You can also make smaller balls if desired. (If the texture of your nut butter makes the dough very dry, add a little more honey or a few tablespoons milk of choice until you can press it together into a ball shape.) Refrigerate for up to 2 weeks. Enjoy!

Notes

*If you prefer, you can omit the protein powder from this recipe and still have a delicious snack. You can also add natural foods like chia seeds or flax seeds (2 tablespoons of each has 4 grams protein).

  • Category: Snack
  • Method: Raw
  • Cuisine: Snack

Keywords: Energy balls, Energy balls recipe, Peanut butter energy balls, Peanut butter oatmeal balls

A Couple Cooks - Healthy, Whole Food, & Vegetarian Recipes


from A Couple Cooks https://ift.tt/37HpjAz

Triple Lemon Layer Cake

Lemon lovers: this one’s for you! Layers of light and buttery lemon cake (the reverse-cream method produces a particularly cotton-soft textu...