Easy Banana Nut Bread

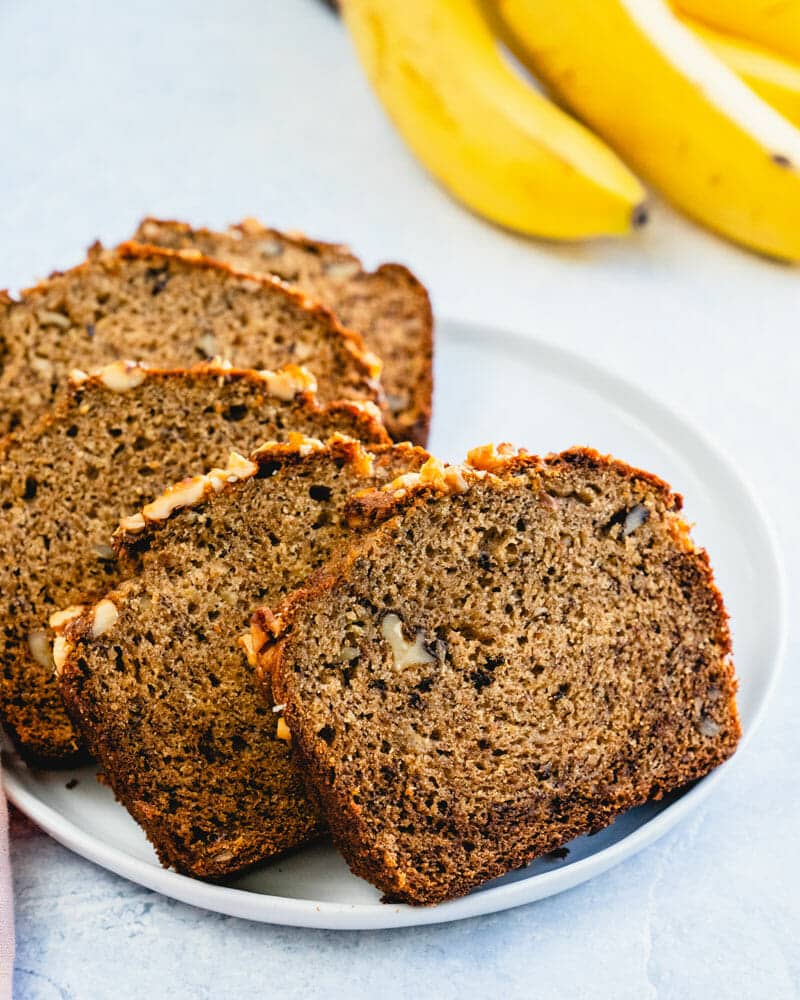
This easy classic banana nut bread is everything a banana bread should be: moist, warm spiced, and studded with crunchy toasted walnuts.

Banana nut bread

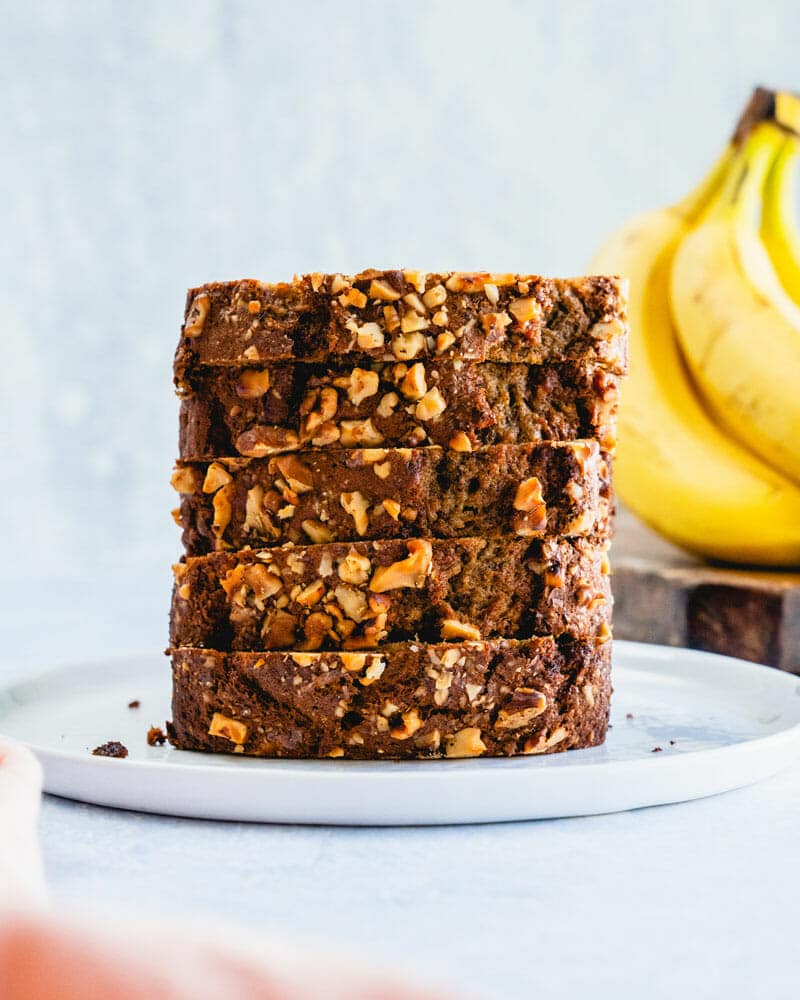
Do you like your banana bread…nutty? A few dark brown bananas are an ordinary sight on our counter (yours too?). Usually our go-to banana recipes are healthy muffins or banana oatmeal pancakes, but this time we wanted something new. Meet this ultra Classic Banana Nut Bread! This one is just like Grandma’s: moist and cinnamon-scented, with bursts of crunchy walnuts throughout. To take it over the top, toast the nuts in a skillet to bring out their nutty undertones before gently folding them into the batter.

Ingredients in this banana nut bread

This banana nut bread is a straightforward take on the classic! We’ve got a few tricks up our sleeve, so here are a few notes on what you’ll need:

  • Bananas: Make sure they are ultra ripe! Spotty and brown is good and black works too!
  • Walnuts: You can use any type of nut in banana nut bread. Walnuts and pecans are the most classic: but you can get creative (see below).
  • Neutral oil: We prefer oil in our quick breads because it doesn’t require melting like butter: one less step!
  • Light brown sugar: Color matters here! Dark brown makes the bread a very dark color
  • Eggs, baking soda & salt: The regular players for a quick bread.
  • Cinnamon and allspice: Allspice gives it just the right unique intrigue in flavor!
  • Vanilla: A hefty dose of vanilla gives it a smooth flavor.
  • All purpose and whole wheat flour: A mix of flours adds a nuance to the flavor a pinch of nutrients.
How to make banana nut bread

How to make banana nut bread

Banana nut bread is like any quick bread recipe. If you’ve made pumpkin bread or zucchini bread, you know the drill! There’s one extra step you’ll need in the beginning:

  • Toast the nuts in a dry skillet. This brings out their nutty flavor (see below).
  • Mix the wet ingredients. Mash that banana with a fork or potato masher first.
  • Mix the dries in a separate bowl.
  • Stir to combine, then gently fold in the nuts.
  • Bake for 45 minutes, then add foil and bake 15 more. Add the foil to make sure the nut topping doesn’t get too brown.

Why toasting the nuts makes a difference

The first step to this banana nut bread is toasting the nuts. Why do you toast nuts? Toasting nuts brings out at beautiful nutty essence that’s otherwise undetectable. You have to taste it to believe it, but there’s a huge difference between a raw nut and a toasted nut.

Over here, we always toast our nuts (yep!) before adding them to salads and desserts. So why not do it before folding into a quick bread? You can toast nuts on the stovetop or in the oven. Here’s How to Toast Nuts (2 Best Ways!).

Easy banana nut bread

Alternate nuts & mix-ins for banana nut bread!

Walnuts and bananas are a classic combination. But you can get creative with other types of nuts or add-ins! Here are a few ideas of mix-ins for banana nut bread:

  • Pecans
  • Hazelnuts
  • Cashews
  • Almonds
  • Chocolate chips
  • Butterscotch or peanut butter chips
  • Dried cherries or cranberries
  • Shredded coconut

The most fun part is combining them to make interesting flavors! Try chocolate hazelnut banana bread, cashew cherry, or coconut butterscotch.

Banana nut bread storage

Here’s the great thing about this banana nut bread: it’s seriously moist and keeps very well! You’ll find it’s even softer and moister the second day. We like to keep it at room temperature because it’s so beautifully moist and you can eat it right away. But here are a few options for storage:

  • How long does banana bread last at room temperature? 4 to 5 days, covered in aluminum foil.
  • Can you refrigerate banana bread? You can! Keep in mind that it does dry out a bit in the fridge. It also tastes a little better at room temp, so you may want to leave it on the counter for a few minutes before eating.
  • Can you freeze banana bread? Yes! Slice it into pieces and wrap it in plastic wrap and then place it in a freezer safe bag or container. It stays good for about 3 months.
Best banana nut bread

Vegan variation

Do you eat plant-based? It’s easy to make this banana nut bread vegan: just substitute flax eggs for the eggs. Flax eggs are simply ground flax seed mixed with water: it combines to make a gel-like substance that’s great as a binder in vegan baked goods.

Want another option? This Vegan Banana Bread is extremely delicious.

More banana recipes (bread, muffins, oh my!)

What else can you make with ripe bananas? So many things. Our favorite are our healthy muffins (many variations below), but there are lots of options. Here are our favorite banana recipes:

This banana nut bread recipe is…

Vegetarian and dairy-free. For plant-based and vegan, substitute flax eggs for the eggs.

Print
Banana nut bread

Easy Banana Nut Bread


1 Star2 Stars3 Stars4 Stars5 Stars (5 votes, average: 5.00 out of 5)

  • Author: Sonja Overhiser
  • Prep Time: 15 minutes
  • Cook Time: 1 hour
  • Total Time: 1 hour 15 minutes
  • Yield: 10 to 12 slices
  • Diet: Vegetarian

Description

This classic banana nut bread is everything a banana bread should be: moist, warm spiced, and studded with crunchy toasted walnuts.


Ingredients

  • 1 cup walnut halves and pieces 
  • 1 1/3 cups mashed ripe bananas  (4 or 5 very ripe bananas)
  • 1/2 cup neutral oil (organic vegetable, canola or grapeseed)
  • 2/3 cup light brown sugar
  • 2 large eggs (or flax eggs for vegan)
  • 1 tablespoon vanilla extract
  • 1 teaspoon baking soda
  • 1/2 teaspoon cinnamon
  • 1/2 teaspoon allspice
  • 1/2 teaspoon kosher salt
  • 1 cup all-purpose flour
  • 1/2 cup whole wheat flour

Instructions

  1. Preheat oven to 375 degrees Fahrenheit. Butter an 8 or 9-inch loaf pan.
  2. Toast the walnuts: Place the nuts in a dry skillet (no oil) over medium heat. Heat, shaking the pan and stirring often with a wooden spoon, until the nuts are fragrant and slightly darker brown, about 4 to 5 minutes. Stay at the stove because the nuts can easily burn! Remove immediately from the heat and transfer to a plate to stop the cooking. Then chop the walnuts: it should be enough for about 3/4 cup.
  3. Make the batter: Mash the bananas in the bottom of a large bowl, enough for 1 1/3 cup. Whisk in the oil, brown sugar, egg, and vanilla extract.
  4. Add the baking soda, kosher salt, all-purpose flour, and whole wheat flour to the bowl and stir together with a spoon. Gently fold in the 1/2 cup walnuts.
  5. Bake: Pour the batter into the loaf pan and top with the remaining 1/4 cup chopped walnuts. Bake 45 minutes, then add foil loosely on the top. Bake another 10 to 15 minutes a toothpick inserted into the center of the loaf comes out clean (or the internal temperature is 200 degrees): the exact timing will depend on the size of the pan.
  6. Cool: Cool in the pan for 15 minutes. Then run a knife around the edge and invert the loaf onto a cooling rack. Serve warm or at room temperature. Storage info: The bread lasts 4 to 5 days at room temperature wrapped in aluminum foil, refrigerated for 10 days, or frozen for 3 months (slice it into pieces and wrap it in plastic wrap then a freezer-safe bag or container).

  • Category: Bread
  • Method: Baked
  • Cuisine: American

Keywords: Banana nut bread

More quick bread recipes

Quick breads are breads that don’t use yeast, like banana bread and pumpkin bread! They bake right after mixing up the batter. Here are a few more quick breads to try:

A Couple Cooks - Healthy, Whole Food, & Vegetarian Recipes


from A Couple Cooks https://ift.tt/2TwtXdk

SFA Trendspotter Panel Reveals Top Trends for 2021

Replicating restaurant and travel experiences in the home kitchen; values-based shopping; and functional ingredients to support and maintain health, top the list of 2021 trend predictions from the Specialty Food Association's Trendspotter Panel.

The panel, composed of retailers, chefs, food writers and educators, and market analysts, considered drivers like the continuing coronavirus pandemic keeping a record number of people close to home, growing social awareness affecting purchasing decisions, and a maturing Gen Z population, in predicting the food trends that will dominate in the coming year. See full list of trends here.

“COVID-19 has a massive impact on trend predictions heading into 2021, as a record number of consumers cook and eat at home more, turning to everyday meals and special treats to comfort and support their mental and physical well-being,” says Denise Purcell, director of content for the Specialty Food Association. “We’re seeing several trends around experimenting with flavors and ingredients, as well as turning to functional or plant-based foods and twists on classic products to avoid menu fatigue.”

The Specialty Food Association 2020 Trendspotter Panelists

  • Melanie Zanoza Bartelme, global food analyst, Mintel, Chicago
  • Monifa Dayo, consultant, chef, The SupperClub
  • Jonathan Deutsch, Ph.D., professor, Department of Food and Hospitality Management and Founding Director, Drexel Food Core Lab
  • Andrew Freeman, founder of af&co./co-founder of Carbonate
  • Illyanna Maisonet, first Puerto Rican food columnist in the country
  • Clara Park, corporate chef of Culinary Innovation for Chelten House Products, head of the Chefs' Council for C-CAP, member of the Advisory Board for The Food Lab at Drexel University
  • Chef Tu David Phu, Top Chef Alumni, TDP Enterprises LLC, founder, Tumami Spices
  • Wendy Robinson, buyer, Market Hall Foods
  • Leith Steel, account strategist and trendwatcher, Carbonate
  • Chris Styler, culinary producer/product development chef, Freelance Food, LLC
  • Bryant Terry, author, educator, and chef-in-residence at the Museum of the African Diaspora SF (MoAD)

Related: Datassential Experts Map Innovation to Culinary Trends; Consumers Treat Food as Medicine During Pandemic.


from Food Trends https://ift.tt/3oBy5qA

Our Best Butternut Squash Soup

This classic vegan butternut squash soup recipe has just the right fall flavor! Creamy and cozy, serve it with crusty bread for an easy meal.

Vegan butternut squash soup

When the air gets that certain chill, it’s like a flip switches. Suddenly the name of that pale orange, oblong squash is on everyone’s lips. It’s butternut squash season! Here’s a recipe that morphs this tough-to-cut squash into a silky orange puree. Meet our go-to Butternut Squash Soup recipe! To put a modern spin on the classic, it’s a plant based and vegan butternut squash soup. You’ll find the flavor is so lusciously creamy, it makes all your fall dreams come true.

All about butternut squash

The squash that everyone’s talking about is more than just a trendy craze. Butternut squash is a pear-shaped winter squash with pale orange skin. Its flavor is sweet and subtly nutty, almost like a mild sweet potato. Popular ways to eat it are in soup recipes, as a pasta sauce, or in risotto. Is butternut squash healthy? Here’s a little breakdown on the nutrition info of butternut squash:

  • Butternut squash is a good source of fiber. It’s got 7 grams per 1 cup diced, or about 28% of your daily need (source). You’ll get that in one serving of this butternut squash soup, along with more from the other ingredients.
  • Butternut squash is also high in Vitamin A and Vitamin C. The same serving size also provides 457% of your daily Vitamin A and 52% of your daily Vitamin C. (Source)
  • Butternut squash is a low calorie food. 1 cup has 82 calories.
Butternut squash soup

Ingredients in this butternut squash soup recipe

Our go-to butternut squash recipe happens to be vegan and plant-based: which is fitting as a modern spin! Instead of rich and heavy butters and creams of the past, butternut squash soup of today can feature beautiful flavors that are fully made of plants. Here’s what we included in this vegan butternut squash soup recipe:

  • Yellow onion
  • Garlic
  • Fresh ginger: this is key to the nuanced fall flavor profile!
  • Carrot
  • Butternut squash
  • Olive oil
  • Vegetable broth
  • Cumin
  • Chickpeas: this trick adds protein to the vegan soup, making it more filling than most!
  • Coconut milk
How to Cut Butternut Squash

What’s the best way to cut butternut squash?

The longest lead time item in this soup? Cutting the butternut squash! This squash is notoriously difficult to peel and chop. We recommend using a fresh butternut squash in this recipe for best results (though you can use frozen in a pinch). Here are some tips for best way to cut butternut squash:

  • Slice off the neck first. Peeling and chopping the base and neck separately makes its oblong shape easier to handle.
  • Peel with a serrated peeler. It’s easier to peel tough-skinned vegetables with a squash peeler because the serrated edges grip the skin. (Here’s the serrated peeler we use.)
  • Slice into planks, then chop. Cut the base and neck into planks, then dice them. Here’s a video to show the process.

How to make butternut squash soup

This butternut squash soup recipe is easy to make, once you’ve gotten past the cutting part! Here are the basic steps to a butternut squash soup:

  • Prep the ingredients. Chop your onion, ginger, carrot and garlic. Specific instructions are in the recipe below!
  • Saute the onion. Cook until it’s translucent, about 5 to 7 minutes. Add the garlic and ginger and stir until it’s just fragrant.
  • Add the remaining ingredients and simmer. Simmer until the veggies are tender.
  • Blend! Add the chickpeas and coconut milk and blend until pureed. We used a large high speed blender, so the entire soup fit. If you have a standard blender, you’ll have to do it in batches.
Butternut squash soup

Chickpeas add body, protein and fiber to a vegan soup

A unique ingredient in this vegan butternut squash soup helps it stay filling by giving it a boost of protein and fiber: chickpeas! Don’t worry if you’re not a chickpea fan. You’ll puree them right into the body of the soup, so the flavor is barely perceptible and the texture is non-existent. You can omit the chickpeas if you like, but we love adding a boost of nutrients and keeping the soup as filling as possible.

What to serve with butternut squash soup

Once you’ve simmered and blended, let’s get to eating this tasty soup! There are lots of ways to serve a butternut squash soup recipe, but remember: you’ve got to add something to make it filling! Here are some options we love:

Vegan butternut squash soup

What else to do with butternut squash?

There are so many ways to use this tasty squash! Here are a few more ideas for fall:

This butternut squash soup recipe is…

Vegetarian, vegan, plant-based, dairy-free and gluten-free.

Print
Vegan butternut squash soup

Best Butternut Squash Soup Recipe


1 Star2 Stars3 Stars4 Stars5 Stars (5 votes, average: 5.00 out of 5)

  • Author: Sonja Overhiser
  • Prep Time: 15 minutes
  • Cook Time: 20 minutes
  • Total Time: 35 minutes
  • Yield: 4 to 6
  • Diet: Vegan

Description

This classic vegan butternut squash soup recipe has just the right fall flavor! Creamy and cozy, serve it with crusty bread for an easy meal.


Ingredients

  • 1 medium yellow onion
  • 3 garlic cloves
  • 1 tablespoon peeled and finely grated ginger
  • 1 cup peeled and chopped carrots (about 2 medium or 1 very large)
  • 1 medium butternut squash (4 cups chopped)*
  • 2 tablespoons olive oil
  • 1 quart vegetable broth
  • 1/2 teaspoon dried sage
  • 1 teaspoon kosher salt
  • 15-ounce can chickpeas
  • 1 cup full fat coconut milk, plus more to garnish
  • Optional garnishes: fresh chopped parsley, pepitas

Instructions

  1. Dice the onion. Mince the garlic. Peel and cut the ginger. Peel and chop the carrots. Peel and dice the butternut squash.
  2. In a medium stockpot or Dutch oven, heat the olive oil over medium heat. Add the onion and sauté until translucent, about 5 to 7 minutes. Add the garlic and ginger and cook 1 minute until lightly browned and fragrant.
  3. Add the carrots, squash, vegetable broth, cumin, and kosher salt and bring to a boil. Lower to a simmer and cook until carrots and squash are tender, about 10 to 15 minutes.
  4. Add the chickpeas and coconut milk. Use a liquid measuring cup to carefully transfer the soup to a blender and blend until smooth (puree it in batches if it’s a standard size blender). Taste and add a little more salt if necessary. If desired, drizzle with a bit of coconut milk before serving. 

Notes

*To speed up prep, substitute frozen butternut squash. 

  • Category: Soup
  • Method: Stovetop
  • Cuisine: American

Keywords: Butternut squash soup recipe, vegan butternut squash soup

A Couple Cooks - Healthy, Whole Food, & Vegetarian Recipes


from A Couple Cooks https://ift.tt/3mxkiQi

Easy Coconut Shrimp

This coconut shrimp is baked to perfection: no one can resist that crunchy, coconut-scented, juicy bite! Serve as an appetizer or dinner.

Coconut shrimp

Who can resist a plate of coconut shrimp? (We certainly can’t.) Each crunchy, coconut-scented, juicy bite is so supremely satisfying, we want to devour the entire plate. This appetizer is popular at seafood restaurants and Tiki bars: and it has that nostalgic 1990’s chain restaurant vibe. Here we’ve decoded the secrets behind the flavor: and for a lighter twist we’ve made it baked, not fried! Serve it with sweet chili sauce for a tasty appetizer: or you can make it dinner by adding a few sides like rice or sauteed veggies. Ready to get started?

Coconut shrimp that’s baked, not fried!

Of course, we had to put our “A Couple Cooks” spin on this coconut shrimp recipe. We’re all about making pretty simple recipes with a healthy twist: and that’s exactly what you’ll find here. Instead of deep frying, all you have to do is bake these babies in the oven until crisp.

This approach not only makes it healthier…it’s much easier! You don’t have to deal with measuring temperatures or misting your kitchen with a light spray of oil.

How to make coconut shrimp

What type of shrimp to use?

There’s lots of variation in the shrimp you’ll find at the store. Here are a few tips on what to look for when you’re making coconut shrimp:

  • Find large shrimp. It’s customary to use large shrimp to get the perfect bite; you can also use medium (and you’ll end up with more bites!).
  • Use tail on. Coconut shrimp is always made with the tail on: this makes for a lovely presentation. Of course, you pop off the tails when eating.
  • Fresh or frozen. You can use either here! Just make sure to thaw the shrimp in advance (see below).
  • Wild caught. If you can, look for wild caught: it’s the most sustainable!

How to make coconut shrimp: basic steps & tips!

You’ll have to make a little assembly line to make this healthy coconut shrimp. That is: there are three stations in the breading process: flour, eggs, and a coconut and panko mixture. Set these up in a line, then go at it! It takes a little time and your hands might get a little messy, but it’s fun! We like enlisting a friend or partner to help, but you can easily do it yourself. Here’s what to do:

  • Lightly coat the shrimp in flour. This helps the next ingredients to stick.
  • Dip the shrimp into eggs. A coating of egg is the glue that holds on the crunchy bits.
  • Coat the slices in coconut and panko. Then dip the shrimp right into the panko and coconut mix.
  • Wash your hands as needed. The egg with coconut and panko can get a little gummy and messy, so wash your hands as needed throughout the process. A tip: we like to keep a bowl of water next to our assembly line so we can quickly rinse off the goo.
  • Bake 12 to 15 minutes at 400 degrees. You don’t even need to flip!
Coconut shrimp

Wait: what’s panko?

Ever worked with panko? Panko is a flaky bread crumb mixture used in Japanese cooking for fried foods. It’s also made its way into international cooking because it’s the perfect breading when frying…or this coconut shrimp! Panko is available in most grocery stores; if you can’t find it, look for coarse breadcrumbs instead. Some purchased breadcrumbs have very fine texture, which wouldn’t end up quite as crispy as panko.

How to thaw shrimp

Are you working with frozen shrimp? The nice thing about shrimp is that frozen tastes nearly as good as fresh (which is not true for all seafood and fish). The only thing is you’ll have to allow for time to defrost. Here are our tips on the best way to thaw shrimp:

  • Day before: If you think ahead, simply place the frozen shrimp in the refrigerator overnight.
  • Day of: Place the frozen shrimp into a large bowl with very cold water. Stir the bowl every 5 minutes to break up clumps of shrimp that freeze together. The shrimp should be defrosted in about 15 minutes.
Coconut shrimp

Dipping sauces for coconut shrimp

Once you’ve made up your baked coconut shrimp, the sky’s the limit for how to serve it! At seafood restaurants and Tiki bars it’s often served with sweet chili sauce. But there are lots of other options! Here are a few dipping sauces we love:

  • Sweet chili sauce: This is the best way to serve coconut shrimp because it has that classic flavor you expect. You can find it near the Asian-style condiments at your grocery.
  • Cilantro sauce: This Cilantro Lime Ranch is a fun option, or try Creamy Cilantro Sauce.
  • Cocktail sauce: Why not? Try it as an alternative to the classic with our Famous Homemade Cocktail Sauce.

Or, make it dinner with a few sides!

Here’s the thing: if I’m going to spend all this time on healthy baked coconut shrimp…I want to make it into dinner! You can easily serve this as a meal if you add a few sides. Here are some ideas:

And that’s it! We hope you love this one: let us know in the comments below.

Shrimp appetizer recipe

This coconut shrimp recipe is…

Pescatarian and dairy free.

Print
Coconut shrimp

Easy Coconut Shrimp


1 Star2 Stars3 Stars4 Stars5 Stars (5 votes, average: 5.00 out of 5)

  • Author: Sonja Overhiser
  • Prep Time: 15 minutes
  • Cook Time: 15 minutes
  • Total Time: 30 minutes
  • Yield: 4

Description

This crunchy coconut shrimp is baked to perfection! It’s easy to make, full of huge flavor, and works as an appetizer or dinner. 


Ingredients

  • 1 pound large shrimp, deveined tail on
  • 1/2 teaspoon garlic powder
  • 1/2 teaspoon onion powder
  • 1/2 teaspoon kosher salt*
  • 1/2 cup flour (gluten-free flour as necessary)
  • 2 eggs
  • 2/3 cup panko
  • 1/2 cup shredded sweetened coconut
  • Chopped parsley or cilantro, for garnish
  • Sweet chili sauce, for serving

Instructions

  1. Preheat the oven to 400 degrees Fahrenheit. 
  2. If frozen, thaw the shrimp.
  3. Pat the shrimp dry. Mix the shrimp in a bowl with the garlic powder, onion powder, and kosher salt
  4. Place the flour in an even layer on a plate. Whisk the eggs in a medium bowl, and set it next to the plate. Place the panko and coconut on another plate, and set it next to the bowl. Line a baking sheet with parchment paper. 
  5. Dredge each shrimp into the flour, then dip it into the eggs, then dredge it into the panko and coconut. Place each shrimp gently onto the baking sheet. Wash your hands off as necessary, since the coating can start to become gooey. 
  6. Place the baking sheet in the oven and bake until juicy and opaque, about 12 to 14 minutes.

  • Category: Appetizer
  • Method: Baked
  • Cuisine: American

Keywords: Coconut shrimp

More easy shimp recipes

Shrimp is ultimate for deliciously healthy recipes! Here are a few more shrimp recipes to cook up this tasty shellfish:

A Couple Cooks - Healthy, Whole Food, & Vegetarian Recipes


from A Couple Cooks https://ift.tt/3oBdH92

Triple Lemon Layer Cake

Lemon lovers: this one’s for you! Layers of light and buttery lemon cake (the reverse-cream method produces a particularly cotton-soft textu...