Very Blueberry Granola with Yogurt Clusters

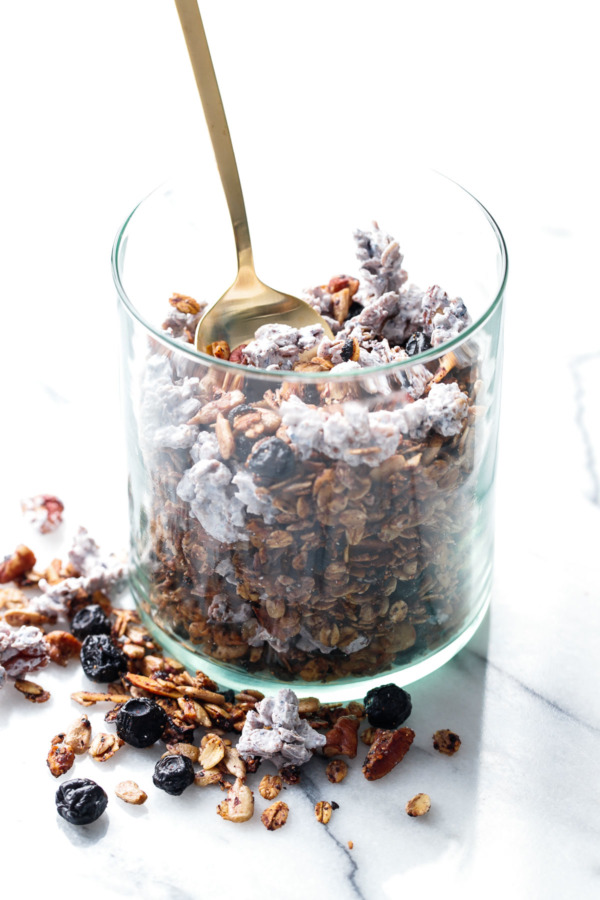
My classic homemade granola recipe gets a fruity twist: with triple blueberry goodness! Blueberry jam, dried blueberries, and freeze-dried blueberries to be exact, plus homemade blueberry yogurt clusters that take this granola from ordinary to extraordinary!

Talk about a unique granola: lightly sweetened with maple syrup and tossed with blueberry jam and ground up freeze-dried blueberries and baked until toasty and golden brown. It’s seriously my new favorite granola, I love sprinkling it on yogurt in the morning or munching on handfuls in the afternoon (where the subtle sweetness is enough to satisfy the afternoon cravings).

My Favorite Homemade Granola Recipe with Blueberry Yogurt Clusters

I seriously packed all the blueberry flavor I could manage into one flavorful granola. The basic recipe is adapted from my favorite granola recipe (very similar to the one we included in our book as a side recipe for our amazing granola chocolate chip cookies.)

It’s a recipe I’ve modified before, previously transforming it into toasted almond & chocolate granola and spicy gingerbread granola, but this time, I went all in with the fruit.

Triple Blueberry Granola Recipe with Dried Blueberries and Blueberry Yogurt Clusters

The granola base is pretty classic, with toasted oats, dried coconut, sunflower seeds, sliced almonds and pecans (though you can mix up the nuts pretty much anyway you like). Toss the oats-n-stuff with a warm mixture of maple syrup, blueberry jam (if you’re using a homemade blueberry jam that’s particularly chunky, I recommend puréeing it first), vegetable oil and a splash of vanilla, then stir until the mixture is completely coated. Oh, and a generous pinch of sea salt!

Bake the granola until it’s golden brown, stirring well every 10 to 15 minutes (the edges tend to cook faster than the middle, and you want it to cook evenly).

But how do I know when it’s done? Well, the granola will have a slight purple tint from the jam when it goes in the oven; when it’s completely toasted the color will have baked out entirely (which bummed me out a bit, but if you think about it, it’s like a color-indicator of doneness, like those toothbrushes that turn white when they need to be replaced). When fully baked, the granola should feel completely dry without any hint of moisture.

I found this particular granola takes a bit longer to bake, I think because of the added moisture from the jam. Whereas the gingerbread granola was done in 30 to 45 minutes, this one took upwards of 50 to 60 minutes. I accidentally underbaked one batch in an effort to preserve some of the purple tint, and it wasn’t very crunchy at all (and let’s face it, less-than-crunchy granola is less-than-ideal). But keep your eyes on it, especially in the last 15 minutes or so – you want it deep golden brown, but it’ll still burn quite easily if you’re not paying attention.

(more…)


from Love and Olive Oil https://ift.tt/2r9GUuZ

In Fair Verona

Market square, Verona, Italy

The city of Verona, despite being one of the most architecturally and historically significant cities in Northern Italy, seems to fly under the radar, with larger cities like Rome, Venice and Florence among the more popular stops for tourists. And that is a shame, because Verona is truly delightful, with its pedestrian-friendly streets, colorful houses, and balconies overflowing with foliage.

We had the opportunity to spend a few days in this lovely city, nestled along the Adige river in Northern Italy, last summer as part of our partnership with Giovanni Rana, whose factory headquarters lie just outside the city. We spent 4 days there, utterly charmed by the time we hopped on the bus to go to Venice (Verona is conveniently located between Milan and Venice, an easy 90 minute bus or train ride from either, making it particularly easy to get to from either city).

Of course, the main attraction in Verona is the Capulet house and Juliet’s iconic balcony featured in Shakespeare’s most famous work. This was the one area of the city that was packed with people, but otherwise the city itself was quite peaceful.

The historical area of Verona is very walkable, its small size makes it particularly pedestrian friendly, most of the historic center being entirely free of cars. There are shiny new streets (if you like high end shopping) and cobbled old streets (full of history everywhere you look), bustling piazzas and quiet strolls along the riverfront. Yes, you’ve got your cheesy souvenir shops filled with all manner of Juliet-themed merchandise, but there are also charming independent shops and restaurants and markets that you can tell locals frequent on a regular basis.

It’s that kind of city: one that looks like a movie set but feels comfortable and lived in.

Arco dei Gavi, Verona, Italy Unique Architecture, Verona, Italy

(more…)


from Love and Olive Oil https://ift.tt/2Hsfmfh

Sakura Matcha Mousse Cake

The sweet embodiment of spring, this sakura matcha mousse cake features a delicate cherry blossom and matcha-scented sponge cake topped with a cloud-like mascarpone mousse. It’s an impressive cake to behold, but surprisingly easy to prepare, making it the perfect recipe for easy entertaining.

Trying to describe the flavor of sakura or cherry blossom is like trying to catch a pale pink petal drifting in the spring breeze. It’s not overly perfumed like rose or orange blossom, rather more sensuous, almond and apricot and a subtle hint of holiday spice. However you describe it, it’s a flavor that pairs beautifully with the grassy notes of matcha green tea, which is exactly what I’ve done here.

Celebrate cherry blossom season with this easy and impressive Sakura Matcha Mousse Cake recipe!

The first time I tried to make this cake I envisioned a transparent pink layer of gelatin on top of the cake with preserved cherry blossom flowers suspended within like dragonflies in amber. Something like this gorgeous cherry blossom cheesecake but with a sponge cake base and mousse filling more like this (can you tell I’ve been down the rabbit hole of Japanese desserts on YouTube?)

Cool idea, right?

Well, sometimes ideas are better off in the abstract.

Because when I actually went to pour on the gelatin, it A. did not stay clear, stirring up the top of the mousse and becoming cloudy as a result; and B. didn’t stay on top of the cake. Instead, it somehow ended up on the bottom, underneath the sponge cake layer (how, I still can’t quite fathom). Granted, when I cut into it it was actually quite pretty, but the top looked a hot mess and as it turns out, the gelatin layer was weirdly salty anyway and the cake tasted better without it.

So I opted to simplify, using only the sponge and mousse layers and cutting out the gelatin layer entirely.

The result is simple and yet stunning, something you can easily throw together ahead of time and serve at your next gathering for show-stopping results. The zebra stripe effect is achieved by coloring half of the mousse with cherry puree and spooning it into the cake mold in alternating concentric circles.

Sakura Matcha Mousse Cake with a gorgeous two-tone zebra stripe effect

Most of the flavor is concentrated in the cake. Infused with matcha and sakura leaf powder (the leaf of the cherry tree is the most flavorful part, moreso than the blossoms, if you can believe it!) it is a feast for the senses. I’m really in love with this cake, so don’t be surprised if you see it again (I’m thinking… matcha cake roll, perhaps?)

The mousse is a cloud of subtle sweetness. The mascarpone adds a hint of tang to offset the sweetness, without overpowering (this doesn’t taste like cheesecake). I opted not to add any additional flavorings or extracts to the mousse beyond a hint of vanilla to ensure the flavors in the cake layer sat confidently in the front row of the flavor theater.

I did add a tablespoon or two of fresh cherry purée for color, you really can’t taste any cherry in the final product. The color is very subtle, reviewing these photos I find myself wishing I would have added a drop of two of pink food coloring to enhance the striped effect. But it’s still pretty nonetheless.

(more…)


from Love and Olive Oil https://ift.tt/2Hln7DN

Out-of-this-World Cocoa Brownies

Rich cocoa brownies topped with a creamy chocolate ganache and crunchy rainbow candy bits. Look familiar? It should: this recipe is a homemade version of Little Debbie’s Cosmic Brownies that’s both true to and an improvement on the original at the same time.

These brownies are seriously out of this world, and I’m not just spewing hyperbole here. I’m always hesitant to say something is the best, but these really might be the best brownies I’ve ever made (and I’ve made a lot of damn good brownies, if I do say so myself).

Homemade Cosmic Brownies Recipe with Chocolate Ganache Glaze and Crunchy Rainbow Bit Sprinkles

Our goal here was to replicate the appeal of the Cosmic brownies, mainly in terms of the chewy, fudgy texture that makes them so addicting. But the mass-produced version has a distinctly fake flavor that I had no desire to replicate. The same for the slightly plasticky consistency of the glaze: a result of copious amounts of corn syrup, I’m sure.

Instead, this homemade Cosmic brownie copycat gives you the fudgyness you crave, but with a lovely, well-rounded chocolate flavor and a silky smooth chocolate ganache on top.

Ridiculously Fudgy Brownies made with just cocoa powder, topped with a simple chocolate ganache and rainbow sprinkles. Copycat Little Debbie Cosmic Brownies Recipe - Homemade is always better!

The brownie base is seriously rich and fudgy, perfectly chewy but not too dense. It’d be a fabulous brownie sans-ganache too: when all you’re wanting is a damn good, plain-ass brownie, this one might just be your new go-to.

The chocolate ganache is made from a mix of milk and semisweet chocolates, producing a lusciously silky texture and a flavor that’s just the right amount of sweet with barely any bitter. And coming from a fan of super dark chocolate, well, this is a lovely respite from the intensity I usually gravitate towards.

(more…)


from Love and Olive Oil https://ift.tt/2qFHlx1

One Pan Moroccan Lemon Chicken with Orzo

Tender boneless chicken thighs and flavorful orzo braised with fragrant Moroccan spices and topped with olives, lemon and fresh parsley. All you need is one pan and 30 minutes and you’ve got yourself one fabulous, flavorful family dinner.

One pot recipes are a miracle of cookery, saving time both during cooking and the dishwashing after the fact. This one is particularly flavor-packed, pairing sultry saffron with turmeric, paprika, ginger and even a hint of cinnamon with bright and tangy olives and a hint of lemon.

One Pan Moroccan Lemon Chicken with Orzo Recipe

One pan recipes are a thing of beauty. You don’t need a separate pot or pan to cook the side dish, rather, it’s all cooked together in a single pan on a single burner with a single spoon.

Not only do you have less dishes to do, but it’s also that much more flavorful since the starch (orzo in this case) absorbs all the delicious flavors from the chicken as it cooks.

It’s like flavor recycling.

One Pan Moroccan Lemon Chicken with Orzo

That said, however, not all combinations work in a one pot situation.

I recall trying one of those one pot pasta kind of recipes, from a very well known food personality, where you cook the spaghetti and the tomato sauce and garlic and all that in a single pot… brilliant in concept, but not so much in execution. The texture of the final dish just didn’t quite work for me. With pasta like spaghetti if you lose the al-dente-ness of the pasta, it just tastes like mush.

Orzo seems to be a bit more practical in this kind of situation, however.

Ideally you want to time it so that the orzo is al-dente at the same time that the chicken is cooked through (poke it with an instant read thermometer, please, just to be sure).

For us, that was about 9 minutes on the dog. If you are using particularly large boneless thighs or bone-in thighs (which you can certainly do), I recommend cooking them for a few minutes longer in the beginning, so that they’ll be completely cooked through after 9 minutes in the pan with the orzo.

If anything, it’s better to overcook the chicken in this case rather than overcooking the orzo, since all the braising liquid surrounding the chicken will keep it extra moist even if it goes over a few degrees.

(more…)


from Love and Olive Oil https://ift.tt/2qjbIc6

Sunshine Waffles with Candied Citrus

Crispy, fluffy buttermilk Belgian waffles with a hint of Meyer lemon and vanilla bean and topped with threads of candied citrus peel for a delightful crunch and an extra pop of citrus flavor.

TL;DR—these waffles are a mouthful of sweet, waffled sunshine. They are perfectly golden brown and crispy on the outside, tender and custardy in the middle, lemon-scented and topped with a pile of delicate candied citrus peel that is honestly what takes these waffles from ordinary to extraordinary.

Meyer Lemon Buttermilk Waffles Recipe with Candied Citrus Peel

I’ll admit, the waffles themselves are pretty standard as far as buttermilk waffles go, ever so subtly scented with lemon. When I first tasted them I definitely thought they needed more lemon flavor, but, once I added on the candied citrus, it turns out that the lightly lemony waffle was absolutely perfect to begin with, no further testing necessary.

Seriously though. The candied citrus is everything. Without it, these waffles are nothing out of the ordinary. But with the candied citrus piled on top… well, now they’re something to write home about. Hell, you should probably call home and tell mom to make these waffles immediately because a letter would take too gosh darn long (and god forbid your mom misses Meyer lemon season! The horror!)

Sunshine Waffles with Candied Citrus Buttermilk Waffles with Candied Meyer Lemon Peel

Meyer lemon season won’t last forever, so might I suggest making these waffles ASAP? Or at the very least, candy some peel and freeze some juice and zest so you can make these waffles all spring and summer long.

(Also, speaking of Meyer lemons, I recently read this intriguing article about their namesake, Frank Meyer, and the other contributions he made to our food culture as we know it today. Fascinating stuff!)

(more…)


from Love and Olive Oil https://ift.tt/2Em1htl

Magic Cellophane Noodle Bowls

Topped with flavorful sautéed tofu, fresh carrot and radish, fried shallots, peanuts, and a sprinkle of fresh cilantro, these Vietnamese-inspired noodle bowls are as vibrant in flavor as they are in color.

The striking blue cellophane noodles, steeped in butterfly pea flowers to achieve their rich color, transform before your eyes when mixed with the acidic sauce. Just in case you needed an excuse to play with your food.

Magic Cellophane Noodle Bowls with Tofu and Fried Shallots

For whatever reason, I’ve been fixated on the idea of blue noodles. (Again, this obsession with naturally colored foods will not go away).

I first tried to make some homemade udon noodles, colored blue with butterfly pea powder. The result, while delicious, didn’t necessarily look appetizing (the blue wasn’t nearly strong enough and the noodles sort of looked like mauve gummy worms).

So I scrapped the idea of homemade noodles, and experimented with dyeing noodles blue by cooking them in a butterfly pea tea, essentially butterfly pea flowers steeped in hot water. I tried a few kinds of noodles, but these mung bean noodles absorbed the color the best.

Honestly it’s sort of hard to decipher the millions of different kinds of noodles out there, but if you ask at your local Asian market for glass or cellophane noodles, you should be good to go. Bean vermicelli or bean threads are another name you might see on the packaging.

Specifically, I used Pine Brand Bean Vermicelli from Thailand, but there are lots of different brands that would work here.

Play with your food: Gorgeous blue cellophane noodles turn pink when you add the sauce!

We served the noodles with a simple Vietnamese-inspired sauce, made with lime juice, fish sauce, sugar, and a bit of fresh garlic and chili. The sauce is very acidic, which is exactly what you need to trigger the color changing properties of the butterfly pea.

Topped with some shaved veggies, sautéed tofu, fried shallots and fresh cilantro, the bowl as a whole reminds me of Vietnamese spring rolls (and in fact, the sauce recipe is based off of a Vietnamese spring roll dipping sauce).

It’s cool and refreshing and perfect for the warmer days of spring and summer.

(more…)


from Love and Olive Oil https://ift.tt/2H3U3NP

Triple Lemon Layer Cake

Lemon lovers: this one’s for you! Layers of light and buttery lemon cake (the reverse-cream method produces a particularly cotton-soft textu...